Skill Level: Confident Beginner
Fabric: Brushed French terry and cotton/spandex from l'oiseau fabrics
Skills: Installing a zipper and reducing bulk in a hem.
The newest star of Love Notions is the Constellation. This is the grownup version of the children's Navigator and one that will find a place in everyone's closet. As usual with Love Notions patterns - options! Do you want a hoodie or would you prefer a collar? How about the hem - a fold-over on a curved hem or would you rather have a band? It also lends itself beautifully to colour blocking! While it does need to be made from fabric with at least 25% stretch, you can make it as light (cotton/spandex) or as heavy (sweatshirt fleece) as you want! There's something here for everyone!
One of the things that really sets this pattern apart from other pullovers is the finish - no raw seams in evidence here! Instead, a bias binding finish on the neck raises this to a professional look. In fact, you'll want to show it off!
The Zipper
The zipper is such an easy install and as with so many Love Notions patterns, there are videos to help you - one for the zipper and another for the bias binding - that take all the mystery out of these steps. I'm going to show you a trick I learned from a school chum of mine who is now a top-notch sewing instructor. The way to make zippers behave is to use double-sided washable basting tape!Once the outside piece of the collar has been attached to the body, you're ready to do the zipper. Instead of using pins, I attach the first side of the zipper with double-sided washable basting tape. I run the tape right down the edge of one side, trim at the bottom and then remove the paper topping.
Now I place one side of the zipper - just as the video shows - but instead of using pins, the tape holds everything securely in place.
Then I simply take it to my sewing machine, and with the zipper foot in place, I stitch right down this side of the zipper.
The other side of the zipper needs a little more care. Again - watch the video to see how Kelly shows you how to make sure that your neck seam will match. I pin that little bit and check to make sure my seams match. When I'm sure that I have it in the right spot, I machine baste that small section and then put basting tape in all the rest and stitch on my sewing machine. And just like that, you're done with the trickiest part of the sew!
The Bias Binding
Just a small hint for you here. I love this finish so much that I make my own bias binding! After I've stitched it to the inside collar piece, I trim just a hair off the edge of the seam so that it will fold over easily.
The Curved Hem
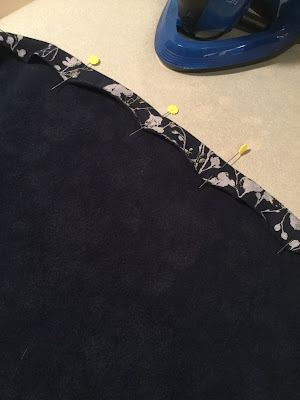
A curved hem is really not that difficult. I use lots of pins to secure it in place. You can see that the curve creates lots of bulges in the hem. So now I bring on the iron. I steam press the hem on the inside of the garment. I just press down with the iron and that seems to shrink the fabric just a little. With all the pinning, if there are any tucks created, they will be tiny.
And as you can see, I now have a nice flat surface for stitching.
The front of the Constellation poses another possible challenge. The kangaroo pocket means you have a double layer of fabric which could result in a bulky hem that sticks out. And there's a way to get around that. After I've pressed the front portion of the pullover hem, I then take out the pins, and using the pressed fold of the pocket lining as my guide, I trim off 1" of fabric. Then I fold the hem back in place and press it again.
Now I have a much less bulky hem to take to my coverstitch machine that will hang properly when I wear it.
I can see that I'll be making more of the Constellation Pullover. Its options and the fabric I use will let me make each one a unique garment that I know I'll be getting lots of wear from. If you don't already have this terrific pattern, you can get it through my affiliate link below


