Friday, 31 March 2017

A Quick Shopping Bag

These days, more and more communities are moving to ban plastic shopping bags.  And I totally sympathize.  We've been using our own shopping bags for years now and have had to replace them a number of times.  Today I decided to try making some simple singlet-style grocery bags.  I found several free patterns online
I started with woven fabric I picked up at my local thrift store.  This is an excellent place to find inexpensive fabric to use in projects like this.  Brightly coloured sheets would also be an excellent source as well.  I wanted a piece of fabric 37 1/2" by 21 1/2", so I folded the fabric in half, selvage edge on the bottom, fold on the left side of my cutting mat and cut a piece 18 1/2" wide and 21 1/2" long.
I folded the fabric right sides together and stitched the open side.  I used my serger, but a sewing machine works just fine.
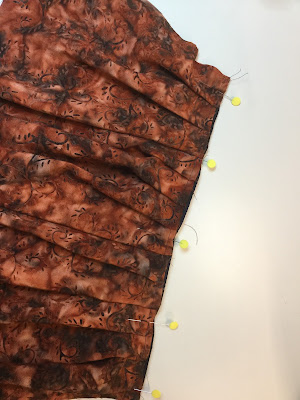
Next I folded the side in approximately 3".  Since this is sort of a pleat, I marked the sides with a pin, measured 3" each side of the pin and marked them, too.
Then I brought the centre in between the markers and pinned the pleat together.   I did this for each corner as you can see above.
Next step is to serge along one end of the bag.  I did this right sides out.
I always weave the serger ends back into the stitching.
Then I turned the bag inside out and stitched across the seam with my sewing machine, just outside the serger seam.  This is for strength.
Now to cut the opening.  I flipped the bag right sides out again and marked 3" in from the sides and 6" across the bottom of the opening, rounding the corners.
Next, to finish the cut portion I serged along the raw edge.  You could finish this with bias tape if you wanted, but this is just an inexpensive, quick shopping bag, so I just serged the edge to finish it.
Now to cut the handle openings.  I drew a line with a marker with a rounded corner and cut this portion of the inside pleat out.
Then, I serged this raw edge, too.
Nearly done now! I re-folded the handles and serged across the top.
Then flipped that inside out and stitched across the seam with my sewing machine - as I did with the bag bottom.  This gives strength to both those weight-bearing seams.  And that's all there is to it!

This was my first attempt, so what would I do differently next time?  For one thing, I'd use a thinner material - this was almost a flannelette and I think something like a good sheet material would a better choice.  Also, I'd cut the inside of the handle down deeper.  While there's plenty of room for my hands, a bit more would be even better.  And finally, I'm might look for a better way to finish the bottom of the bag so it's more like the plastic bags.  However, this is a great start!

Sunday, 26 March 2017

Olympia - seen from my "mature" eyes!


Fabric – rayon/spandex and Barcelona from Fabricland
Skill - Finding the right fabric and pattern

The Love Notions’ new Olympia dress is definitely one of the simplest and most pleasing dresses I’ve seen in a long time.  Knee length and maxi length plus 5 sleeve lengths from sleeveless to long give plenty of choice. 
I was of two minds on whether or not to take part in the testing. It’s a gorgeous dress, but being a woman of “a certain age”, I wasn’t sure I could carry it off!  I weighed up my options:  the dress is fairly fitted in the bodice and waist but flares away attractively.  The neckline is a deep vee, but that also takes the attention away from my neck.  And at the back, do you notice how it stands up in a sort of abbreviated shawl collar?  So clever!
Elbow length could be the perfect length for my upper arms.   And I thought that if I chose the right fabric, this dress could work for me – so I applied to test and was accepted.

One thing you can count on with Love Notions patterns – they are very well tested!  Our designer, Tami Meyer, came out with no less than 9 versions and several small updates for testing!  Love Notions gets things right!  And they certainly did with this dress. There are separate bodices for various sewing cup sizes as well as lines to lengthen and shorten both the bodice and skirt.  There's even advice for cutting the length of the bodice based on the fabric you use for the skirt.  Not only that, there are instructions for installing a zipper to make life easier for nursing moms!  Love Notions has covered it all!

So what did I come up with to help me carry off this dress?  First of all, fabric is important!  The suggested fabric requirement is for: “Light to medium weights knits with at least 25% stretch such as jersey/rayon blends, ITY, cotton/lycra, liverpool and ponte.”   I wanted a natural fibre and while I love cotton/spandex (or Lycra) I wanted something with a little more drape.  Fabrics like Ponte de Roma are substantial knits and I thought they’d be a bit too structured for what I had in mind.

My first attempt was with a burgundy-coloured bamboo/spandex.  The fabric had excellent drape, but I decided that the solid colour didn’t do my less-than-firm body any favours!  All that aside, I loved the dress!  Choose the right fabric for me and we have a winner!
For my next try, I used a rayon/spandex with a tie-dye pattern in black and pewter blue.  And this time I think it worked.  This was Version 3 of the dress and it fit me quite well.  Tami’s instructions for the collar were excellent and there is now a video in the Love Notions Tutorial section that totally demystifies the procedure.
With time running out, I decided to give the latest version a go – this time with a Barcelona (I know – synthetic, right?) which had a patchy snakeskin pattern in black,  white and a hint of blue, following along in the theme of avoiding solid colour.  I added 2” to the skirt length as I no longer like my knees showing!  I’m really pleased with the result and now have at least two dresses that I feel proud of wearing.  Not only that, but I’ll be comfortable in them, too!

So my conclusion for the woman “of a certain age” is that fabric is key.  Use a fabric with lots of drape.  You don’t want the material that hugs you! And choose a fabric with a pattern that will help disguise small irregularities that you would rather keep to yourself! 

But the final conclusion is that this is a pattern that we can all love and we can all wear.   And until Saturday, April 1st, you can get the Love Notions’ Olympia on sale for only $8 - no Fooling!  Click on the link to get your copy - you won't regret it!


Sunday, 12 March 2017

Buttons, Buttonholes and maybe a little extra

Pattern - Classic Oxford Button-Up from Peek A Boo
Fabric - quilting cotton from Fabricland
Skills - buttons, button holes, hemming

I used to dread buttons!  Especially on shirts that required a lot of those little shirt buttons.  My hands would cramp up and it seemed to take forever to do.  Finally I decided to try putting them on with my sewing machine - I do seem to take a while to come to these new-fangled ideas!  Now I wouldn't put them on any other way.

So many people avoid shirts with buttonholes and buttons because the thought of sewing them is intimidating.  It's actually so simple if your machine has the right stitches. If your sewing machine doesn't have automatic buttonholing and you're thinking of getting a new one, definitely go for a machine that has this capability.  Quite inexpensive sewing machines have this capacity.
So lets get started!  I like the way Peek A Boo does button up shirts.  You do the buttons and buttonholes right off the bat when you're just dealing with 2 pieces of pattern.  The first step is to turn and press the shirt fronts 1/4" and then 1".  Then stitch down the front pieces 1" from the edge to secure the fold.  I always stop a couple of inches from the bottom so I can neatly hide the hem in the shirt edge.  It gives a cleaner finish.  Now you're ready to do the buttonholes.
Buttonholes for males are on the left and for females on the right.  Since this is for a boy, I'm putting them on the left.  Start 2 1/2" from the top edge and mark it with a pin.  The instructions say anywhere from 2" to 3" apart, so I spaced the rest of the buttonholes 2 1/2" apart.
I always practice on scrap first as I want to be sure I have the right setting for the buttons, so I made 2 buttonholes, one 15 mm and one 16 mm to see which would fit the buttons best.  I cut them open using my seam ripper and after passing the button through each, decided that 15 mm was the best fit.

Just an aside here - I check out my local thrift store regularly as they remove buttons from unfit shirts and sell them separately.  Decent shirt buttons are so hard to find and I get them very cheaply this way.
I line up the left front so that the edge of it is just peeking out the side of the buttonhole attachment and the needle is lined up at the pin, lower the foot and remove the pin - and away we go!  Stitch all the buttonholes, then trim the loose thread and cut open the buttonholes.
Now it's time to sew on the buttons.  For this part, I use an ordinary washable glue stick.  Another way of securing the button is by putting a piece of tape over it and that's how I started, but as soon as I tried glue stick, I've done it this way ever since.  And don't worry about getting glue on your needle.  The glue is dry by the time you are ready to stitch and your needle stays clean.
Line the two fronts up side by side.  Apply the glue stick to the back of each button and place it on the right side of the shirt front so that it's lined up with the middle of its buttonhole.  Make sure that the holes in the button are square with the edge of the shirt.
My sewing machine has a button foot and a stitch for sewing on the buttons, but you can sew on the buttons without these.  I'll address this at the end of the post.  Since the buttons I'm using have 4 holes, I stitch diagonally - it's a much stronger stitch than just going horizontally or vertically.  With the button stitch selected, I set the button in place and lower the needle so that it's in the left hand hole, then when I think I have the button lined up properly, I lower the foot.  I always hand-wheel the first few stitches to make sure I have the button set up properly.  Sew all the buttons on in this angle first and trim the loose threads.
Now we're ready to do the other angle.  Just as before, line up the buttons, lower the needle, then the foot and sew.  Trim the loose threads and you're done!
Then all you have to do is loosen the buttons so they're no longer glued in place and button up your front.  Not the easiest to see with the fabric I was using, but the buttons and buttonholes are perfectly lined up and it only took a few minutes.
Now what if your machine doesn't have a stitch for sewing on buttons and you don't have a button foot?  No problem!  Remove the foot from the shank. Start with zig zag and a stitch width of 4.  If you can select 0 for the stitch length, great.  I can't on mine.  Then lower the feed dogs so that the fabric isn't drawn through.  Put the button in place and lower the needle to the left hand hole (or right if that's where your zig zag stitch starts).
Now gently lower the foot shank on to the button.  It's precarious, but it should hold.  Hand-wheel the first few stitches, and when you know you have the right stitch width selected, sew on the button.  When you're finished sewing on the buttons, don't forget to raise the feed dogs!  I started sewing on buttons without the button foot but as soon as I realized how great sewing on buttons by machine was, I went right out and ordered one.  I'll bet after doing a set you'll be doing the same thing!


Friday, 10 March 2017

Making Pleats - with a fork???


Pattern - Prisma from Love Notions
Fabric - unknown polyester knit from Fabricland
Skill - pleating with a fork

I did promise to show how to make pleats with a fork, didn't I!  When we were testing, our designer, Tami Meyer, found a video on making pleats with a fork.  It looked so ingenious, I wanted to try it out.  Of course, your fork must be the right size!  My fork was slightly less than an inch in width which was the perfect width to make the 1" pleat that the Prisma pleated skirt calls for.
When you have your skirt piece ready, reserve the first half inch for the side seam.  Set your sewing machine to a basting stitch and secure a couple of stitches in place. Start with the fork facing you and slide the fabric in between a couple of tines - as shown above.
Now turn the fork towards yourself (counter clockwise) until it's flat on the sewing machine.  This creates your pleat.
Slide the pleat towards your half-inch mark.  Subsequent pleats will slide up beside to the pleat before as shown above.  While you are sliding the pleat into place, make sure that the pleat is square and the edge of your fabric is straight across the right side.
Now continue the basting stitch along, catching the pleat with a couple of stitches.  Then stop to make the next pleat.
Continue catching the fabric with the fork, turning the fork to create the pleat and stitching to secure the pleat until you have come to the end of the fabric.

This is not the most exact way to make pleats, but it's certainly quick!  No marking - except possibly for the first half inch.  I found a number of videos on the Internet, but most of them formed pleats in the opposite direction which I discovered sometimes caught on the sewing machine's foot.  And if you find yourself sewing lots of pleats, there are even tools for this.  Using a fork is just so much more fun!

Tuesday, 7 March 2017

Love Notions' Prisma - with a woven skirt?


Pattern - Love Notions Prisma
Fabric - l'oiseau fabrics - Solids Basic charcoal,  Fabricland - woven rayon
Skill - pleats

 Love Notions' new Prisma - a drop-waisted dress for girls.  Versatile in the extreme, Prisma offers 3 sleeve lengths, 3 neck options and A-line, flared and pleated skirts in sizes 2T to 16.  I was assigned the pleated skirt option with a scoop neck.  During the testing process a question was asked about the skirt - could it be made from woven fabric?  I immediately thought, "Yes!"  Provided the fabric chosen was appropriate, there was no reason that it wouldn't work and I decided to give it a try.
My chosen fabrics were cotton/spandex knit from l'oiseau fabrics for the bodice and short sleeves with a woven rayon for the pleated skirt.
The pattern piece for the skirt is very clearly marked and in no time at all the pleats were pinned into place.  You can find a video tutorial for making the pleats on the Love Notions website.  A half inch space is left open at each end so that the front and back of the skirt can be joined.  Later I learned of another way to make the pleats - a method involving a fork!  But that is a post for another time.
Now to the sewing machine.  With a long basting stitch, I sewed the pleats down taking care the pleats weren't disturbed on the back side.
Using a woven for the skirt worked out extremely well - no stretch at all and the skirt fits perfectly to the bodice piece.
Next step - pin the skirt to the bodice front, right sides together.
On to the serger - serge the seam.  Then repeat for the other skirt and back bodice pieces.
After the front and back have been joined at the shoulder, the sleeves have been serged in place and the neckband added, it's time to serge the side seams.  And at this step, it's important to change your serger's differential - N through the woven material and 1.5 through the knit.
Almost done!  Pin the hems for the skirt and sleeves and finish - I decided to go with a reverse coverstitch with thread in the looper to match the rust in the skirt.
And that's all there is to it!  I still have to press the pleats although they look lovely unpressed as well.  The Prisma is a versatile pattern with a little something for everyone.  Quick, easy and adaptable - what a great pattern!