Showing posts with label needles. Show all posts

Wednesday, 24 February 2021

The New Metra Blazer in Scuba!


Pattern - Love Notions Metra Blazer
Skill Level - Intermediate
Fabric - Mid-Weight Scuba from Discovery Fabrics
Skills - marking wrong side, crisp corners, understitching, pressing


The new Metra Blazer from Love Notions looks challenging but it's surprisingly easy.  As usual, there are videos to help you.  Two collar choices offer a shawl collar and a stylish wide one.  The star of the show is the roomy pocket with its clever welt finish - who knew a welt pocket could be so easy!  And the burrito roll method gives you a lovely clean inside front.  It comes with a full bust option for those with a difference of 4" or more between high and full bust measurements and sizes XS to 5X.  What more could you want!

Of course I have to pass along some hints in my blog posts!

When it's hard to figure out which is the right side...

Discovery Fabric's Mid-Weight Scuba is amazing stuff.  It's made in Italy by Borgini and is positively delicious to cut and sew.  My scuba was a colour called Clematis - a lovely royal blue.


My big problem was trying to decide which was the right side since both sides looked the same to me - even under a magnifying glass!  I finally decided to pick one side as the right side and mark the other side with tailor's chalk for consistency.  

Since a lot of the stitchery was going to be with my sewing machine, I did some sample stitching and to my dismay, I got skips!  Okay - I was using a universal needle, so I switched it with a stretch needle and all was fine.

Steam Pressing

Since Discovery's solid colour Mid-Weight Scuba is 80% nylon and 20% elastane, you can't press right on the fabric.  Steam pressing while you're sewing is important so using a pressing cloth and a clapper is the way to go.


First, I steam pressed over a pressing cloth.  The cloth allows me to keep the iron on a little longer and really get the steam down into the fabric.


Then I quickly lift off the iron and pressing cloth, and put on the clapper.  My husband made mine from maple but you can buy them.  They provide a little weight and keep the steam in place, giving you a sharper finish.  With a fabric like scuba, they're invaluable.

Sharp Corners

Something else I was concerned about with scuba was getting a sharp corner on the bottom of the front, but a couple of the testers taught me a clever way to get that.
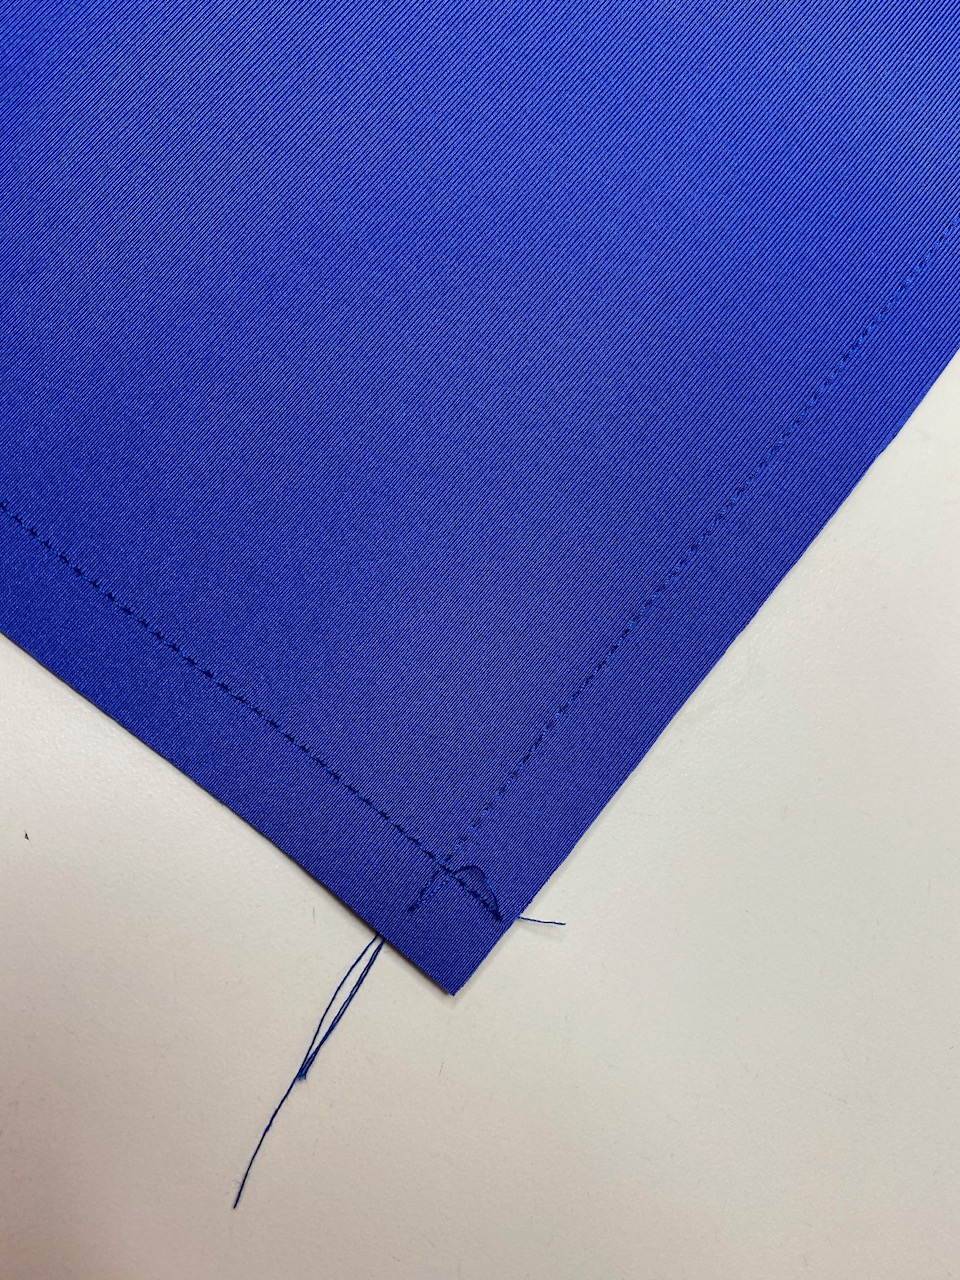

Stitch right past the end - no pivoting - and then start stitching from the other side.


Then clip the corner.


Now the part that gives you the crisp corner.  It's all in how you fold the seams inside.  I turn the garment right side out.  I fold up one seam, and then fold the other on top of the first.  A tiny poke of the corner finishes the process and I have a crisp corner - as soon as I do some understitching!

Understitching

Understitching makes pressing so much easier and when you're dealing with a fabric like scuba, it is such a help!   I wasn't able to get right into the corners or the back of the collar because it was produced by the burrito method, but I understitched where I could.


So what is understitching?  It is attaching the seam to the inside of the garment.  With the Metra Blazer, at the bottom of the front, I stitch the seam to the inside - the lining.  I fold the seam away from the outside and stitch close to the seamline.  

But then when you come to the collar, you have to reverse this because now the lining is showing on the outside.    What understitching does is make pressing so much easier and it makes a seam lie the way you want it to.  So let's take a closer look at the understitching on my Metra Blazer.  You can click on any picture to make it bigger.


With the bottom corner flipped back you can see the understitching - you can't get right to the corner but you can get pretty close.


It continues up to the break for the collar. 


After the break, I have to switch my understitching to the other side so that the stitching is hidden under the collar.


And when everything goes back to the way the Metra Blazer will be worn, the understitching doesn't show, but helps so much in the finish of the garment.  And look at that corner! Now instead of understitching I could have topstitched, but I decided that I preferred my blazer without it.

When I helped test the Metra Blazer, my first version was also made with fabric from Discovery Fabrics.

I used their Yoga Stretch for version one and did the lining and welt in Margarita Pink so that the lining would show on the lapel of the collar and contrast with the dark grey of the rest.  Just another way you can change up your Metra Blazer.

Surprisingly easy to make, the Metra Blazer is an excellent addition to any wardrobe.  Shawl collar or wide collar and lovely big pockets with a professional finish, it's a blazer that you'll love to make and be proud to wear.  You can get your copy through my affiliate link below.

Love Notions Metra Blazer sizes XS to 5X


Saturday, 8 December 2018

Serging Heavy Fabrics

I've been making a lot of pullovers lately!  Love Notions has pullover/hoodies for the whole family and I've been using the patterns to make Christmas presents.  There's the Navigator for children, the Constellation for women and just recently, the North Star for men - something for everyone!

Most of my pullovers have been from the wonderful soft sweatshirt fleece from l'oiseau fabrics - they bring in their fabrics from Europe and the quality is amazing.  Plus they have just the best selection of ribbing anywhere!  The sweatshirt fleece combined with ribbing results in thicker fabric than I usually sew and needs techniques I don't usually use.

I'm one of those sit-down-and-sew people who don't think a lot about the finer points of sewing - I just want to get on with it!  While serging thicker seams with the sweatshirt fleece, I actually broke a few needles.  In fact, I got down to only one of the special needles my serger takes.  So off to the store I went and moaned to the gal behind the counter that it was probably time to get my serger serviced.  She asked what stitch length I had my serger set at. Uh, I dunno!  And what size needles was I using?  Uh....

So - okay - I guess I need to pay more attention to the fabric I'm serging and the needles and settings I should be using!  And now I'm going to pass along what I learned to you - although you probably already knew it!
The gal said - take a look at the seams on jeans.  They have longer stitches to go through the heavier fabric.  You need a longer stitch for the sweatshirt fleece.  She said to take it up to 4 which is the highest my serger (Baby Lock Imagine) will go.  This is where the stitch length dial is on my machine.
She said that if the fabric is having difficulty going through the serger and I'm needing to help it along, I need to lower the pressure on my presser foot.  On my serger the presser foot adjusting screw is on the top directly above the presser foot.  The manual will show where it is on yours and tell you how to adjust it.
And finally, she said I needed heavier needles.  I'm using 11 for most things, but when serging heavy sweatshirt fleece to use 14's.  These are the needles my serger takes - yours might be a different number.  Always use the needles recommended for your machine.

Serging went so much more easily after I followed her advice!  I guess I still have an awful lot to learn!

There are other things you can do to make serging heavy fabrics easier.  You can reduce the seam bulk.  When attaching cuffs or bands, I make sure that the seams are folded opposite each other.
Another little tip I learned while researching this subject is that if your fabrics are thick, you can cut a starter for your seam that will allow the fabric to feed more easily into your serger.  Cut a notch at the beginning, the width of your seam allowance.  Then, with the presser foot down, lift the nose and slide the fabric in with the cut edge against your serger's knife.

I certainly know a lot more than I did when I started sewing these wonderful pullovers and now am ready to serge with more confidence.

If you don't already have the Love Notions Pullover/Hoodie family, you can get the patterns through my affiliate links below

Love Notions North Star Hoodie & Pullover for men
Love Notions Constellation Hoodie & Pullover for women
Love Notions Navigator Pullover 2T-16 for children