Showing posts with label marking. Show all posts

Wednesday, 24 February 2021

The New Metra Blazer in Scuba!


Pattern - Love Notions Metra Blazer
Skill Level - Intermediate
Fabric - Mid-Weight Scuba from Discovery Fabrics
Skills - marking wrong side, crisp corners, understitching, pressing


The new Metra Blazer from Love Notions looks challenging but it's surprisingly easy.  As usual, there are videos to help you.  Two collar choices offer a shawl collar and a stylish wide one.  The star of the show is the roomy pocket with its clever welt finish - who knew a welt pocket could be so easy!  And the burrito roll method gives you a lovely clean inside front.  It comes with a full bust option for those with a difference of 4" or more between high and full bust measurements and sizes XS to 5X.  What more could you want!

Of course I have to pass along some hints in my blog posts!

When it's hard to figure out which is the right side...

Discovery Fabric's Mid-Weight Scuba is amazing stuff.  It's made in Italy by Borgini and is positively delicious to cut and sew.  My scuba was a colour called Clematis - a lovely royal blue.


My big problem was trying to decide which was the right side since both sides looked the same to me - even under a magnifying glass!  I finally decided to pick one side as the right side and mark the other side with tailor's chalk for consistency.  

Since a lot of the stitchery was going to be with my sewing machine, I did some sample stitching and to my dismay, I got skips!  Okay - I was using a universal needle, so I switched it with a stretch needle and all was fine.

Steam Pressing

Since Discovery's solid colour Mid-Weight Scuba is 80% nylon and 20% elastane, you can't press right on the fabric.  Steam pressing while you're sewing is important so using a pressing cloth and a clapper is the way to go.


First, I steam pressed over a pressing cloth.  The cloth allows me to keep the iron on a little longer and really get the steam down into the fabric.


Then I quickly lift off the iron and pressing cloth, and put on the clapper.  My husband made mine from maple but you can buy them.  They provide a little weight and keep the steam in place, giving you a sharper finish.  With a fabric like scuba, they're invaluable.

Sharp Corners

Something else I was concerned about with scuba was getting a sharp corner on the bottom of the front, but a couple of the testers taught me a clever way to get that.
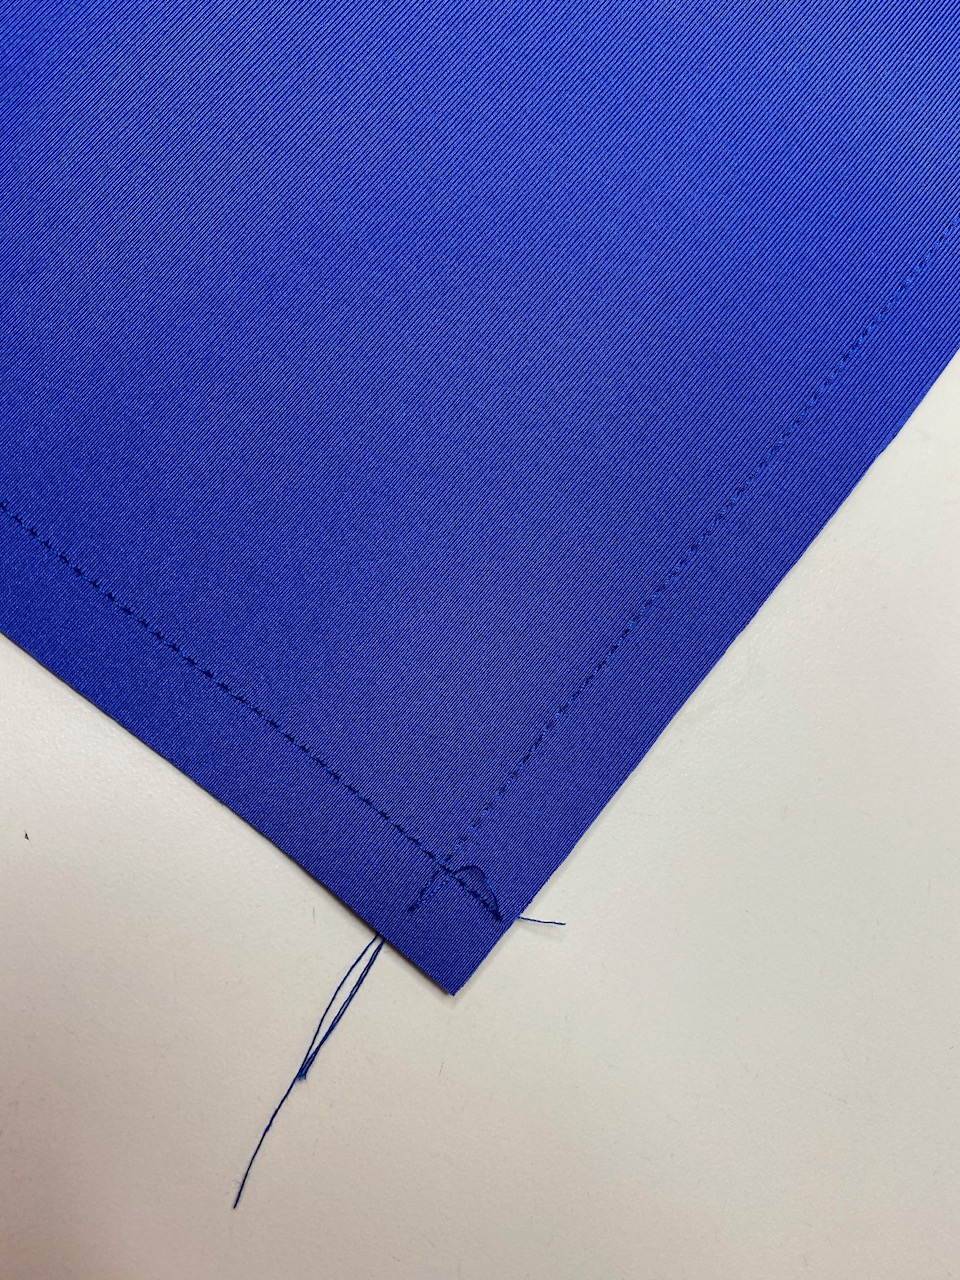

Stitch right past the end - no pivoting - and then start stitching from the other side.


Then clip the corner.


Now the part that gives you the crisp corner.  It's all in how you fold the seams inside.  I turn the garment right side out.  I fold up one seam, and then fold the other on top of the first.  A tiny poke of the corner finishes the process and I have a crisp corner - as soon as I do some understitching!

Understitching

Understitching makes pressing so much easier and when you're dealing with a fabric like scuba, it is such a help!   I wasn't able to get right into the corners or the back of the collar because it was produced by the burrito method, but I understitched where I could.


So what is understitching?  It is attaching the seam to the inside of the garment.  With the Metra Blazer, at the bottom of the front, I stitch the seam to the inside - the lining.  I fold the seam away from the outside and stitch close to the seamline.  

But then when you come to the collar, you have to reverse this because now the lining is showing on the outside.    What understitching does is make pressing so much easier and it makes a seam lie the way you want it to.  So let's take a closer look at the understitching on my Metra Blazer.  You can click on any picture to make it bigger.


With the bottom corner flipped back you can see the understitching - you can't get right to the corner but you can get pretty close.


It continues up to the break for the collar. 


After the break, I have to switch my understitching to the other side so that the stitching is hidden under the collar.


And when everything goes back to the way the Metra Blazer will be worn, the understitching doesn't show, but helps so much in the finish of the garment.  And look at that corner! Now instead of understitching I could have topstitched, but I decided that I preferred my blazer without it.

When I helped test the Metra Blazer, my first version was also made with fabric from Discovery Fabrics.

I used their Yoga Stretch for version one and did the lining and welt in Margarita Pink so that the lining would show on the lapel of the collar and contrast with the dark grey of the rest.  Just another way you can change up your Metra Blazer.

Surprisingly easy to make, the Metra Blazer is an excellent addition to any wardrobe.  Shawl collar or wide collar and lovely big pockets with a professional finish, it's a blazer that you'll love to make and be proud to wear.  You can get your copy through my affiliate link below.

Love Notions Metra Blazer sizes XS to 5X


Monday, 19 October 2020

Breckenridge Henley


Pattern - Love Notions Breckenridge Henley
Skill Level - Confident Beginner
Fabric - Cotton/spandex French Terry and jersey from l'oiseau fabrics
Skills - pattern marking, machine sewing buttons


Love Notions' newest pattern is the Breckenridge Henley.  As always, options, options, options!  Shirt, tunic and dress lengths as well as short and long cuffed sleeves, plus a rolled tabbed long sleeve option.  

The fabric suggestions are light to medium weight kits with at least 40% stretch.  I chose to make mine with cotton/spandex French terry from l'oiseau fabrics with the cuffs and neckband in cotton/spandex jersey.  This pattern is relatively simple once you get the neckband on and of course there's a video to help you with this step.  And naturally I have a few tips for you to help make it easier!

Marking

I can't stress enough how important marking is.  Make sure you transfer all marks to your pattern pieces.  I like to use long quilting pins with coloured heads.  I always use green ones to mark the backs of sleeves and white to mark the fronts and I do the same for the armscye markings.  That way, I never risk putting a sleeve in backwards.

I did the same for the neckband


I matched the pin colours on the band and the bodice front.  There are so many marks on these pieces you can see that it makes the job so much simpler when you have a quick reference to guide you.

Sewing on Buttons by Machine

It took me a long time to get brave enough to try sewing on buttons with my sewing machine.  Now I wonder why I waited so long!  Sewing with a needle and thread always took forever and cramped my hands up.  Once I found out how easy it is, I went out and bought a special foot for my machine, but you can do it without that and I'll tell you how later.


The first thing you need to do is position your buttons.  I pinned the placket together in between where the buttons would go to keep it in place, then dabbed glue stick on the backs of the buttons and placed them on the placket.  Don't worry about the glue - it won't clog up your needle.  By the time you take it to your sewing machine, the glue will be mostly dry.

Now it's time to sew the buttons on.  My machine has a stitch for sewing on buttons, but if yours doesn't, I'll tell you how to get around that, too!

I place the buttons under the foot roughly positioned and drop the foot to hold it in place.  My buttons have 4 holes and I like to do them diagonally.  I put the needle in the left-most hole and then turn the wheel by hand to make sure it's going to slip easily into the right-most hole and when I'm sure I have the button positioned properly, I let the machine do the work.  I do each button once to hold it in place.  

After trimming the loose threads, I turn the front piece around and do the other set of holes.  Each button is now sewn in place with an X of thread.

And to seal the deal, I dab the back of the stitching with Fray Stop to make sure the buttons stay in place.

Now if you don't have a button foot or a button stitch, you can still sew buttons on with your sewing machine as long as it has a zig zag stitch.

Take the foot off your machine.  Put the button roughly in place and drop the post right on it.  You will need to adjust the position a bit.  

Now turn off your feed dogs and set your machine to zig zag.  You want the stitch length as short as you can do it - like 0.

Lower the needle almost to your button and adjust the width of the zig zag stitch so that the needle will go easily into both holes - turn the wheel by hand.

I do about 3 or 4 stitches for each set of holes.  You can tie off the threads at the back and trim them.  And this is where I like to fix them with a drop if Fray Stop.


The placket neckband and row of buttons really finished the Breckenridge Henley. I love that there's a beautiful V and it's not too low.  The sleeve lengths give me plenty of options to change the look up and I love that I can make it tunic and dress length as well as shirt length.  

You can get this pattern through my affiliate link below.


Wednesday, 10 June 2020

Forte and Chitosante for summer comfort


Pattern - Love Notions Forte Top & Dress
Skill Level - Confident Beginner
Fabric - Discovery Fabrics' Chitosante Interlock
Skills - personal adjustments, markings, finishing seams when not hemming

Now that the warmth of summer is approaching, I needed a top that would provide coverage from the sun as well as keeping me cool - it's a tall order!  But with the right pattern and the right fabric I knew I could do it. (To see a picture in more detail, simply click on it.)
First of all, the fabric.  I had 2 metres of an amazing fabric from Discovery Fabrics called Chitosante Interlock.  You may not have heard of this before, but the properties are mind-blowing!  It's a polyester fabric made with chitosan, which is biomass from crab or shrimp shells combined with textile fibres.  It's antibacterial, odor-resisting, moisture-wicking, breathable, fast-drying, pill resistant and as if that wasn't enough, has UPF 50.  I'm not sure you could ask for anything more in a fabric!  It's also light as air and doesn't curl (psst - no hemming needed!)

And as for the pattern, I'd already made a few Love Notions' Forte Tops - view B - which is fitted on the bust, but loose and airy below.  And it's a sure sign that you love a pattern when you already have several hanging in the closet and are prepared to make more!  It's one of my favourite patterns.

I also knew that there would need to be a few adjustments made to the pattern to fit my unique body.  I am 5'8" tall and usually have to add to allow for my height. 
I have to put some of that addition above the bustline so that my full bustline matches the pattern's.  This is especially important for the Forte View B so that the seamline is below the fullness of the bust.  The last thing I want at my age is to look pregnant!  So I add 1.5" above the bustline.
I also need another inch for my height, so I add that to the skirt part.
Having added 2.5" to the front, I now needed to add the same amount to the back and I distributed it in 2 spots, just as I did for the front.

This taken care of, I now had to decide on the sleeve.  I love the bell sleeve - it's so classy looking - but for everyday wear, I needed something a little shorter.  I decided to make the bell 8.5" long, but I would need more flare.
I slashed into the shortened bell 3 times, spread the pieces 1" apart at the ends and taped them in place.  I would add this to the sleeve cut on the bell line so that the end of the sleeve would fall below my elbow.

Pattern adjustments made, I was ready to cut and sew!  But I always have to throw in a few tips, don't I!

Marking

Transferring pattern marks is so important!  I use multi-coloured quilting pins and designate a certain colour for each marking to make sure I'm putting the pattern together correctly.
For sleeves, I use yellow for the shoulder seam, white for the front marking and the green pin goes right between the 2 marks for the back.  I use those same coloured pins for the armscye of the bodice.  I used orange pins for the skirt and bodice marks and made a mental note which side of the skirt was the side seam - so easy to get mixed up if you don't take care!

When Not Hemming

My Chitosante Interlock doesn't have a curl and because it's so light, I decided not to hem the sleeves or bottom.  I needed, however, to make sure that the ends of the seam were secure.
Both seams were serged, so I threaded the serger tail back through the seam and finished it off with a dab of Fray Stop.

I love my new Forte made with Chitosante Interlock - it's like wearing thistledown!  I know that I'll be comfortable and protected through whatever summer decides to throw at me.  If you'd like to check out this amazing fabric and the wonderful pattern I made it in, there are affiliate links below.

Discovery Fabrics - Specializing in technical and performance fabrics for outdoor and activewear.


Love Notions Forte Top and Dress - XS - 5XL

Sunday, 17 November 2019

Love Notions' Octave Coat - and a few hints


Skill Level - Intermediate
Fabric - Discovery Trekking Outfitters' Polartec Windpro Stretch
Skills - making belt loops, marking, pressing, hemming

Love Notions' newest pattern is a stylish coat with either a shawl collar or a dramatic hood.  You have the option of a button closure or a belt - or choose both!  It comes to mid-thigh which is the perfect length for covering a tunic top.  You can make it lined or unlined and the pattern includes the new expanded sizing.  It even has a full bust pattern piece!
The Octave Coat is drafted for woven fabrics but can be made with stable knits as well.  I chose to make my coat with Discovery Trekking Outfitter's Polartec Windpro Stretch fleece - a fabric I fell in love with the moment I laid hands on it!  It's light, yet warm and is water repellant and wind resistant.  It cut and sewed beautifully and has just the right stability for this pattern.

I've bought a few coat patterns over the years - some I've tried and failed at and others I was just too intimidated to try.  Until now! I found the Love Notions Octave Coat a much easier sew than I was thinking it might be.  Tami's patterns often have videos to take the mystery out of some of the techniques and this pattern is no exception.  You will find a video to help you with the unique pocket construction and two to walk you through steps in lining the coat.  And I have a few hints to help you along!

Making Belt Loops

When I took a serger course, I learned a quick and easy way to make belt loops. 
First, serge a tail that is longer than the loop pattern piece.
Tuck the tail in the centre of the pattern piece and leave it hanging out the end.  Now fold the loop piece over the tail, keeping the tail in the fold - well away from your needles.
Serge your seam allowance - in this case .5".
Use the tail to pull the loop right side out.  My fabric was thick and I had to work a bit to get it started.
And there's your belt loop!

Marking

Make sure you transfer all the pattern markings to your pattern pieces.  I use coloured pins for sleeve/armscye markings and always use one colour for the back markings and another for the front ones so that I never get mixed up.  The markings for the pockets, though, require something a little different.  I found a fine felt marker that contrasted with my fabric.  Since my fabric was quite thick, I wasn't worried about it bleeding through, but you can get fabric markers that will wash out - or you could use tailor's chalk.
I insert a pin through the marking on the wrong side of the fabric and pull back the pattern piece so I can apply a mark to where the pin goes in the fabric.
After I've transferred all the pocket markings for that piece, I give each one another dab to make sure they're clearly visible.

Pressing

I hate ironing clothes but I simply couldn't sew without an iron.  Some fabrics, however, aren't supposed to be ironed, and my fabric fell into that category.  You can still give those seams a press, however - all you need is a pressing cloth.  Mine is an old piece of sheeting.
Set the iron temperature for as low as it will go and still provide steam. Prepare your seam for pressing - is it pressed open or do you need to press it to one side?  Put a cloth over the seam and press over the cloth.  That's all there is to it!

Hemming

The Octave Coat has a slight curve to the hem and that means that unless you allow for that, you'll have tucks in the hem.  That might not matter in a thinner fabric - such as cotton/spandex - but in thicker fabrics it might distort the hem and I want it to look clean on the inside, too.
To get around that, I serged the raw edge of the hem with the differential on my serger turned up.  This draws the fabric in a little.  Now when I pin it, I can give it a good press and I don't need to worry about tucks.
The Octave Coat can be made in woven or stable knits like I used and covers sizes XS to 5XL.  The videos and clear, concise instructions will help you walk through the construction.  It can be dressed up or made more casual depending on which fabric you use.  Comfortable, stylish - this is a coat that belongs in everyone's closet!  You can get the pattern through my affiliate link below.

Love Notions' Octave Coat

Thursday, 21 September 2017

On Your Mark!

Pattern - Love Notions Forte
Skill Rating - Confident Beginner
Fabric - l'oiseau fabrics
Skills - pattern marking and gathering

The Forte is Love Notions's newest pattern and as is usual with Love Notions patterns - you really get your money's worth!  There are options galore!
In addition to 4 body options, there are sleeve choices of straight, gathered, flounced and flared.  There are even options for dresses!  See what I mean about your money's worth?
Every new pattern I try has me revisiting skills I learned long ago - sometimes all the way back to high school!  This pattern reminded me of lessons I learned about gathering, as our very first project was an apron with a gathered skirt.  The Forte that I tested was View D and it has a gathered front.  I chose to sew the mid-length sleeve with bell. View A also has the gathered skirt and one of the sleeve options is gathered as well.  It may look like a difficult pattern, but it's really quite easy as long as you pay attention to the pattern's marking.

Transferring the Pattern Piece Marks

As soon as I've finished cutting out my pattern pieces, I make sure I transfer the marks - all of them.  These are important for putting together the garment.  I have evolved a system that works for me and I change my tactics depending on what fabric I'm sewing.

My final test garment was made with a light cotton/spandex knit from l'oiseau - a Majapuu fabric called Hortensia which I think came from Finland.  It was 200 gsm in weight and has 110% stretch - a weight and stretch that works very well with view D.  The wrong side of my fabric made marking easy.  Click on any picture to see it in more detail.
Starting with a sleeve top, I placed a pin at the centre top and made small dashes with a gel pen for the  back and front marks.  You can get washable fabric markers, but I didn't bother, because the marks will be taken out by my serger's knife.
Now it's time to do the other sleeve top.  Flip your pattern piece over and make sure the marks are visible on the back side of your pattern piece.  Mark as you did the first sleeve piece.
On the bodice front there is a circle marking where you will stop your stitching line - and secure it as this will be the bottom of View D's V neck.  (My sewing machine has a tie-off function for this step, but you can backstitch and get the same result.) I start by putting a pin through the centre of the circle.
Now I back off the pin and pattern piece, flipping back the corner so that I can see where the pin goes through the fabric, and mark it with my pen - again, this won't show on the front, but you can use a washable fabric marker.
My first test of the Forte was with dark purple ITY knit from Fabricland and of course pen markings wouldn't show on that.  I used tailor's chalk to make the markings on the fabric.

Gathering

Gathering is a step that sometimes people new to sewing are nervous about.  There really isn't much to it, so let's go through it step by step.
First, set your sewing machine's stitch length to at least 4 - a basting stitch.  Run a line of stitching 5/8" from the edge and another 1/4" from the edge.
Pin the skirt to the bodice piece, right sides together.  Pin at the ends and match the notches in the middle.  Now working on one half and holding both threads together pull one side until the gathered portion is the same length as the bodice piece behind it.  Pin it in place with several pins.
When you've got them matching in length, wrap the thread in a figure 8 around the pin - like you're not supposed to do with vacuum cleaner cords!  You'll notice that I don't have many gathers at the edge on this side.  This is going to be the side seam and I've left this little bit gather-free so that the side seam will be as smooth as possible.
Now pull the gathering threads on the other side.
You're ready to stitch the seam.  I like to baste it on my sewing machine before I take it to my serger.  I use the stitch length of 4, just like I did with gathering and I run the stitching 3/8" from the edge - right between my gathering lines, removing the pins as my sewing machine's needle gets to them.  If you don't have a serger, change your stitch length to 2.5 and you're almost done.
Before serging I trim all the threads except the 5/8" line top thread, which I carefully bring below the stitching so it won't get caught up in my serging line - this makes it easy to remove after the serging is done.
Now I'm ready to take it to the serger and I have a nice basting line to follow with the left needle guide on the top of my serger's foot.  Take care while serging that your bodice piece is flat and not getting tucked up in the serging - I lift the fabric up every now and then to make sure that all is well.  It's easier to take a little extra time at this point rather than have to take out stitches later!
Serging done, I can now remove the gathering line that will show below the seam.   I trim the left hand thread and carefully pull out from the right.
Then I remove the loose thread from the right side of the fabric and I'm ready to press the seam up.
In addition to my final test Forte, I also did a couple of shirts in ITY (interlock twist yarn), which is sold as Barcelona at my local Fabricland.  It's a polyester fabric with beautiful drape and worked extremely well in View D.

Once you have the marking done, and your gathering is completed, the rest of the Forte is pretty simple.  And when you have finished you have created a beautiful, wearable garment that is made just for you - a one-of-a-kind garment you can be proud of!

You can get the pattern below using my affiliate link

Love Notions Forte