Showing posts with label colour blocking. Show all posts

Friday, 12 February 2021

Prisma becomes Rosie!


Pattern - Love Notions Prisma for girls
Skill Level - Confident Beginner
Fabric - cotton/spandex from l'oiseau fabrics
Skills - colour blocking, stripe matching


My friend's granddaughter is a voracious reader (actually "listener"!) and has an amazing imagination - you never know who she actually is from day to day.  Her mother told me that she's enjoying the series about Rosie Revere the Engineer and asked if I could make her a Rosie dress for her upcoming birthday.


As I was not familiar with that reading series, her mother sent me a picture and right away I could see that Love Notions' Prisma would be absolutely perfect!  And since mother was taking care of the head scarf, all I needed was white, black and red knit fabric.

Rosie's dress is very plain with black trim at the neck and sleeves but with alternate black and red stripes at the bottom of the dress.  Now that part would need planning!
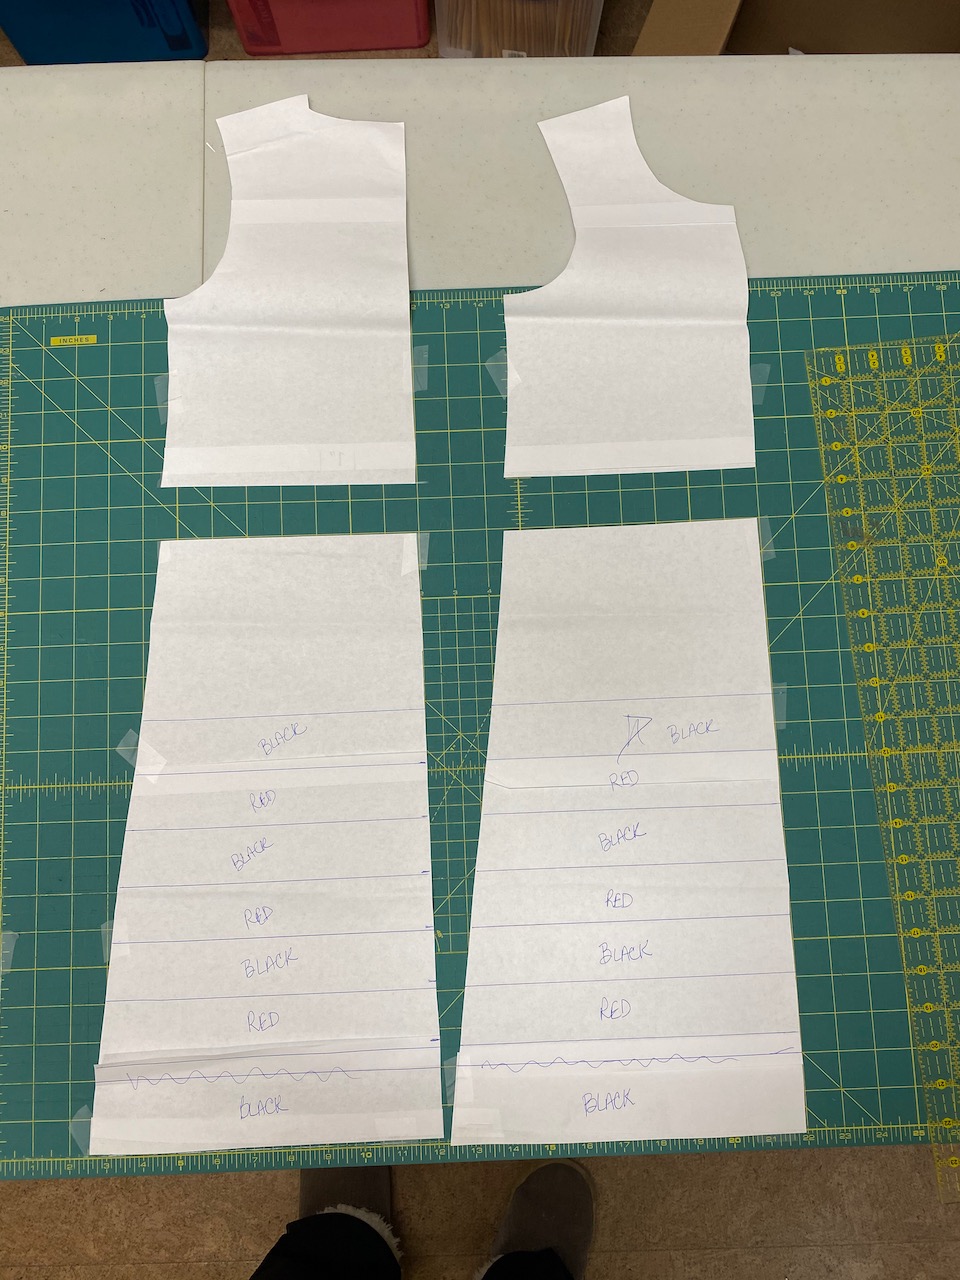

I decided on 1" stripes joined with .25" seams so each stripe would be 1.5" wide.  The bottom black stripe would be 2" wide to account for the hem.  And then I would have to add 1.5" to the body above the stripes to account for the loss that the seams cause.  I taped the pattern pieces to my cutting mat and drew lines for the stripes, then cut for the addition to the body.  I was careful to write the colour on each stripe.


I also marked the stripes with numbers and F and B for front and back.  The Prisma version I was sewing is the A-line view, so all of the stripes would be different lengths and the outsides would have a slight slant to them.  I also made the hem straight instead of the slight curve to simplify things.


Then I placed all the pattern pieces with their fabrics.
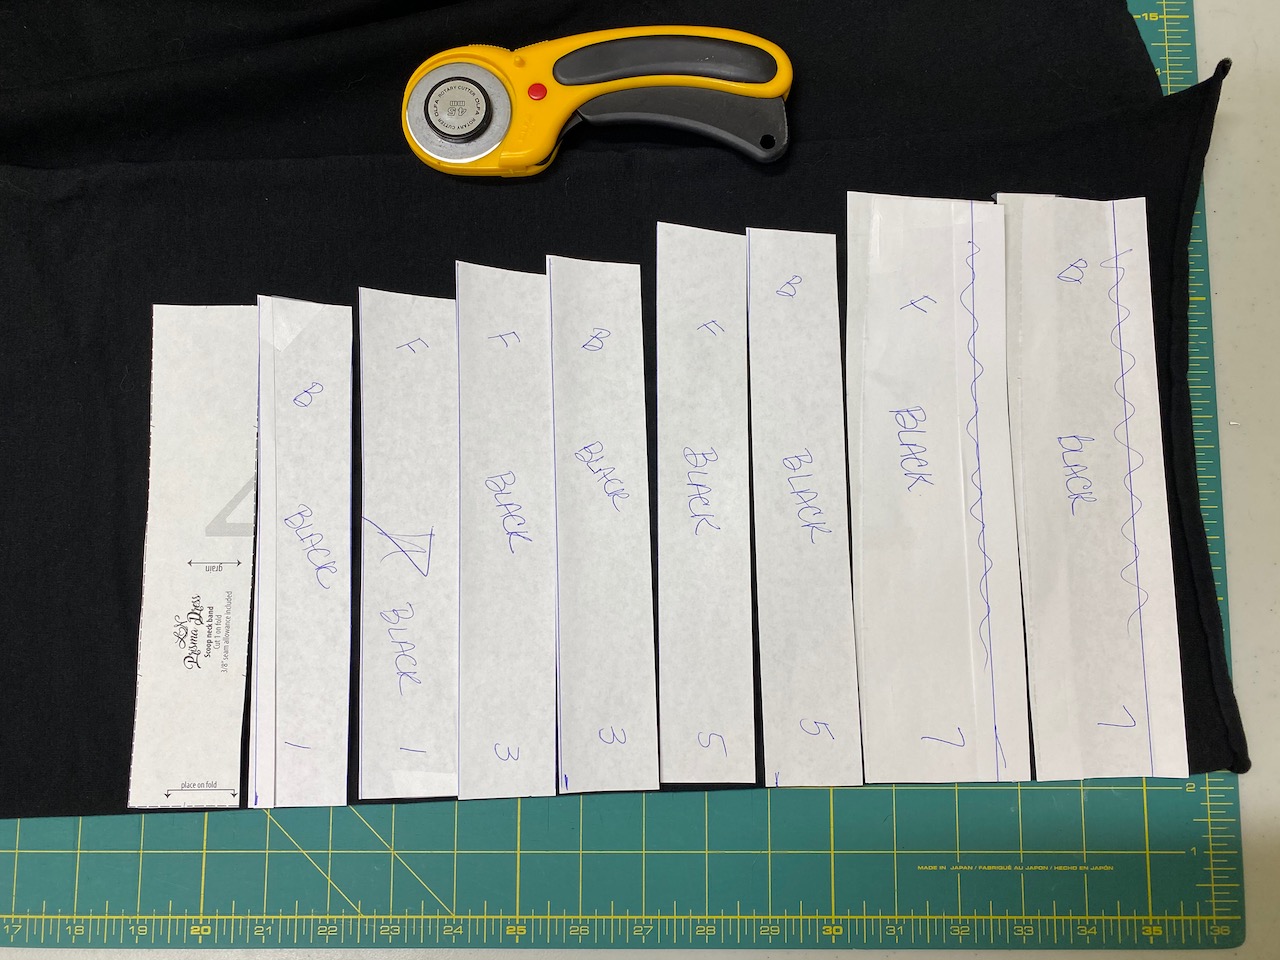

Time to cut everything out.  The stripes were easy to cut - one at a time, starting with the largest and using the straight side of the previous cut for the next one.


Once everything was cut out, I placed all the pieces in their respective task.


I started with the stripes, going from bottom up and now you can see why numbers were important!  I serged the stripes together with a .25" seam.  And as I serged on each stripe, I steam pressed the seam down.


It's easy to get confused when sewing the stripes together (ask me how I know!) so here's a tip.  You are sewing the long side of the shorter strip to the short side of the longer strip.  When you do that, you should see a triangle of the stripe on the under side.


With all the stripes serged together, then they were serged to the body.  Now it was time to assemble the dress.


Front sewn to back and sleeves in place, the side seam needs to be sewn.  This is the tricky part!  I carefully pinned front to back and then with a longer stitch, sewed the striped section together with my sewing machine to make sure the stripes stayed put.

I did the rest of the assembly with my serger, but when I got to the striped section, I made sure the serging line was just outside of the straight stitching line.


A steam press and we're ready for the final bits - neckband, bands for the ends of the short sleeves and hemming.
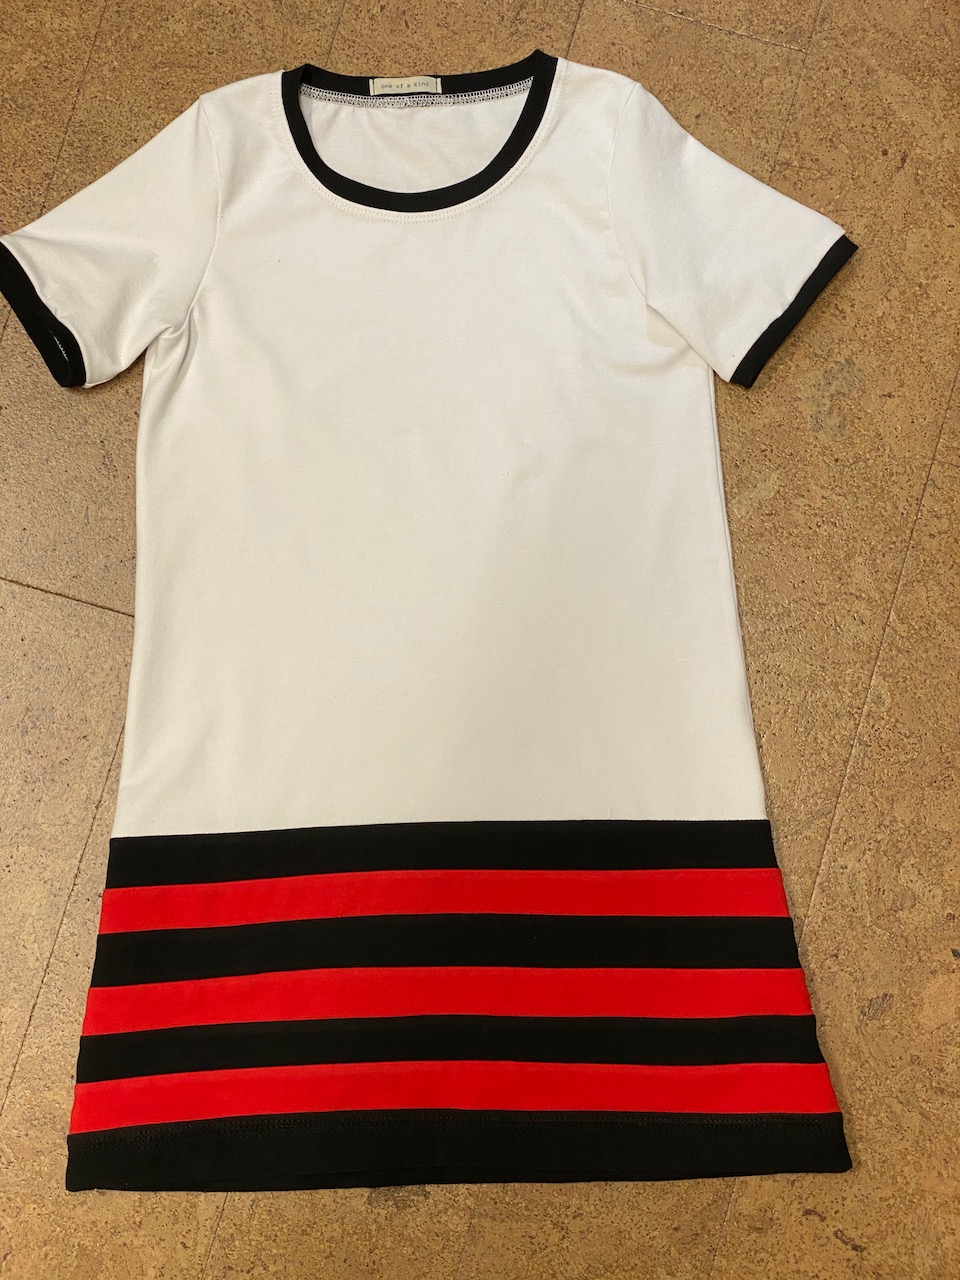

I'm pretty pleased with how well it turned out and I hope "Rosie" likes it too!  Since it's a birthday present, I don't have a modelled photo, but if I get one, I'll update this post.


One final touch - a label which I purchased from Love Notions - which seemed totally appropriate!

If you don't already have this wonderful pattern for girls, you can get it from my affiliate link below.

Love Notions Prisma Dress sizes 2T to 16


Saturday, 20 June 2020

Vanguard! For a Biking Shirt!


Pattern - Love Notions Vanguard Kit long sleeve tee
Skill Level - confident beginner
Fabric - Discovery Fabrics Polartec Delta
Skills - Colour blocking

My grandson is turning 9 in a few weeks.   For part of his present, he said he wanted a biking shirt with padded elbows.  I knew that I couldn't possibly make something that would give him proper protection, but my son assured me that what he really wanted was a shirt with a moto look.
- like the Moto Maxx pants I'd made him the previous year.  Okay - that I can do! (Click on any picture to see it in more detail.)

The Fabric

I had the perfect fabric on hand.  He loves athletic fabrics and Discovery Fabrics specializes in athletic fabrics.  I had 3 colours of Polartec Delta sitting on the shelves - marine blue, apple green and grey - and decided to use them all.
Polartec Delta is a wonderful fabric and I had previously used it to make competition shirts for my son and his training partner.
It's highly breathable, has superior wicking properties, regulated drying, reduced clinging, odor control and is highly durable.  You can see from the picture above that it's also constructed to pull moisture away from your body. Just what my hot-bodied grandson needs.

The Pattern

The Vanguard Kit is one of my most-used patterns.
There are all kinds of options built right in - even colour blocking.  But the colour blocking I had in mind, I was going to have to figure out myself.

Colour Blocking

I drew up and coloured a design of what I had in mind and then printed off and cut out the plain fronted shirt with long sleeves.
Then I drew lines on the pattern pieces and wrote the colour on each section also making a note of where I would have to add 3/8" for seam allowance.  I cut double the middle grey sleeve sections, because it was going to have moto stitching on it.  That was going to be the padded portion.
After cutting the colour block sections, I placed each colour with its fabric.  I was ready to cut out.
I didn't add a seam allowance as all my lines were going to be straight.  I used my ruler as the guide to add the seam allowance.
You can see on this piece that the seam allowances are all there.

Sewing

I worked on the front first.
I laid all the pieces out in order and working from the bottom up, pressing the seam allowance up (and I used a pressing cloth so the fabric wasn't damaged) and topstitched as I went.  The diagonal blue section was added last and topstitched.

Then on to the sleeves.


I laid them out just as I did with the front with the grey section being two layers, pressing the seams up and topstitching.

For the moto stitching, I drew lines with tailor's chalk.
I stitched the lines on my coverstitch machine.  I could have used my regular sewing machine, but I wanted this section of the sleeve to have lots of stretch.  I used a notch on my foot as my guide in stitching.
So here is what the sleeve looks like front and back.
Now with all the piecing done, all I had to do was sew up the pieces, put on the neckband and hem.  Sounds like a lot of work, but it only took me a morning.  I know my grandson will love his new biking shirt.  He loves this fabric and he'll appreciate all the amazing properties which will keep him cool and dry while he's out on the mountain biking trails.  If you don't already have this pattern, you can get it from my affiliate link below.  And do check out Discovery Fabrics for all the amazing products they carry.

Love Notions Vanguard Kit
Discovery Fabrics