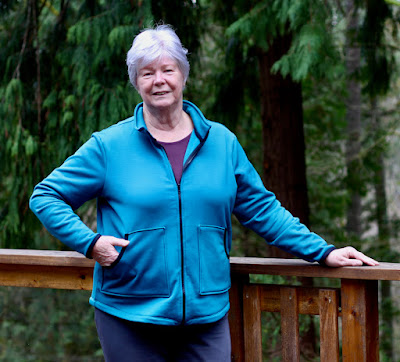
Pattern - Love Notions' Thomas Track Pants for Men
Skill Level - Confident Beginner
Fabric - Yoga Stretch from Discovery Fabrics
Skills - Right side/wrong side, steam pressing, wicking, washing

My husband's been asking for track pants for a while now and Love Notions has come out with a quick and simple pattern that fills the bill. It can be made in knit or woven and can be plain or colour blocked. There's also the option to have zippers at the hem to make it easier to pull on or off over shoes. Lots of possibilities, too, with this pattern. Make it in a flannel fabric for PJ bottoms. How about moisture resistant fabric for rain pants?

These pants are just begging to be made in athletic fabric, so I made hubby a pair in Discovery Fabric's Yoga Stretch. Yoga Stretch is a type of supplex which is actually a treatment done to nylon to make it feel more like cotton. It's very comfortable and versatile and I thought it would be perfect for the Thomas Track Pants. I had lots of Yoga Stretch in heathered charcoal which is 48% nylon, 45% polyester and 7% spandex.
At Discovery Fabrics, they specialize in athletic materials that you generally don't find in a fabric store. They have a large selection of quality fabrics - everything from heavy winter wear to light summer wicking fabrics - and everything in between.
Not so long ago, I'd never sewn athletic fabrics before, and there was a bit of a learning curve for me with this new category of fabrics, so I thought I'd pass along some of the things I've learned along the way.
Wash your fabric
Although most athletic fabric isn't going to shrink on you, I always wash and dry before I sew. And even though the care instructions are for washing in cold water and drying on a low setting, I always wash and dry the way it would be handled if for some reason hubby did the laundry! Leslie Hanes from Discover Fabrics calls this "bomb proofing"! There are other reasons to always wash fabrics before you use them, and to me, besides the possibility of shrinkage, the most important reason is that you are removing contaminants which might have come into contact with the fabric on the way from the mill to the warehouse. Just ask someone who's moved bolt after bolt of new fabric to show you how dirty their hands get!
How do you tell the right and wrong side?
Sometimes a fabric looks virtually the same on both sides. And especially if you've washed it, you might not know which is the right side. And sometimes, athletic fabrics will lay perfectly flat, making it hard to decide which is the right side. With nearly all knits, there's an easy way to tell.

Along the selvage edge, if you stretch the fabric it will curl to the wrong side.

Along the cut edge, if you stretch the fabric it will curl to the right side.
It's easy to mix up the sides when you're sewing if the fabric looks the same on both sides - and I've certainly done that with black fabric! It wasn't until I wore the pants I'd made outside that I suddenly realized I'd mixed up my sides! Now I take extra care before I start pinning pieces together.

And looking at the cut edges of these two pieces, I know the edges to the right are against the grain and I can easily see that top piece is wrong side up and the bottom is right side up.
Wicking Fabrics
Wicking fabrics are wonderful, because the way they are made, they pull moisture away from your body and allow it to evaporate off the outside face of the fabric. With some wicking fabrics, it's easy to tell right from wrong side because the side that goes against your body has a waffly texture. Some aren't so easy, though. A drop or two of water will help.
This fabric is Polartec Delta and is smooth on both sides. I put drops of water on the wrong side to demonstrate how it works.

The top two wet marks are on the wrong side of the fabric, and you can see that they're already being drawn away and are fading. The bottom wet mark is on the right side of the fabric. It's much darker because the moisture is being pulled from the back to the front.
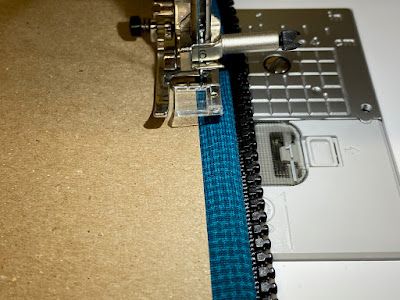
Steam Pressing
You may think that you can't press athletic fabrics, but you can. The secret is a pressing cloth. I just use a piece of old sheeting, but when laid on top of a fabric that would normally melt if touched with an iron, I can even leave the iron on for a short while to create that necessary fold for a hemline. Or in the case of the Thomas Track Pants, a seam that I can press open to accommodate pockets.
I open the seam with my fingers and quickly lay the pressing cloth on it to keep it open. Then I place the steaming iron on it for a couple of seconds.

And you can see in this picture the difference between where the seam has been pressed open and where I still need to iron.

And now for a bit more about the Thomas Track Pants for Men. This versatile pattern is also a pretty quick sew. I assembled the pattern, cut it out, and sewed it up complete with pockets in a morning. The colour blocked and zippered options will take a little longer but you can definitely do it in a day. The instructions are easy to understand and the pattern is available in AO versions for the print shop, a projector version and the print-at-home version that's a snap to put together as it's trimless. Definitely a pattern to have in your collection. And be sure to check out the quality athletic fabrics at Discovery Fabrics!