Showing posts with label Discovery Fabrics. Show all posts

Tuesday, 1 December 2020

Compose Robe


Pattern - Love Notions Compose Robe
Skill Level - Confident Beginner
Fabric - Bamboo Fleece from Discovery Fabrics
Skills - pocket corners

I've been wanting a good robe pattern for a while and Love Notions has come out with a great robe pattern!  It can be knee or calf length and you have the choice of a hood or a banded edge.   Of course, the pattern for women comes with the full bust option.  Not only that - you can make the Compose Robe in knit or woven fabric!  How versatile is that?  And wait - there's a children's pattern, too!

I chose to make my calf-length robe using luscious peacock green bamboo fleece from Discovery Fabrics. The fleece is light, yet warm and oh, so cosy!  The face is smooth with a fuzzy inside.  I'll be making hooded robes for my grandchildren in this fabric, too!

There are lots of the perfect little features we've come to expect from Love Notions patterns. 
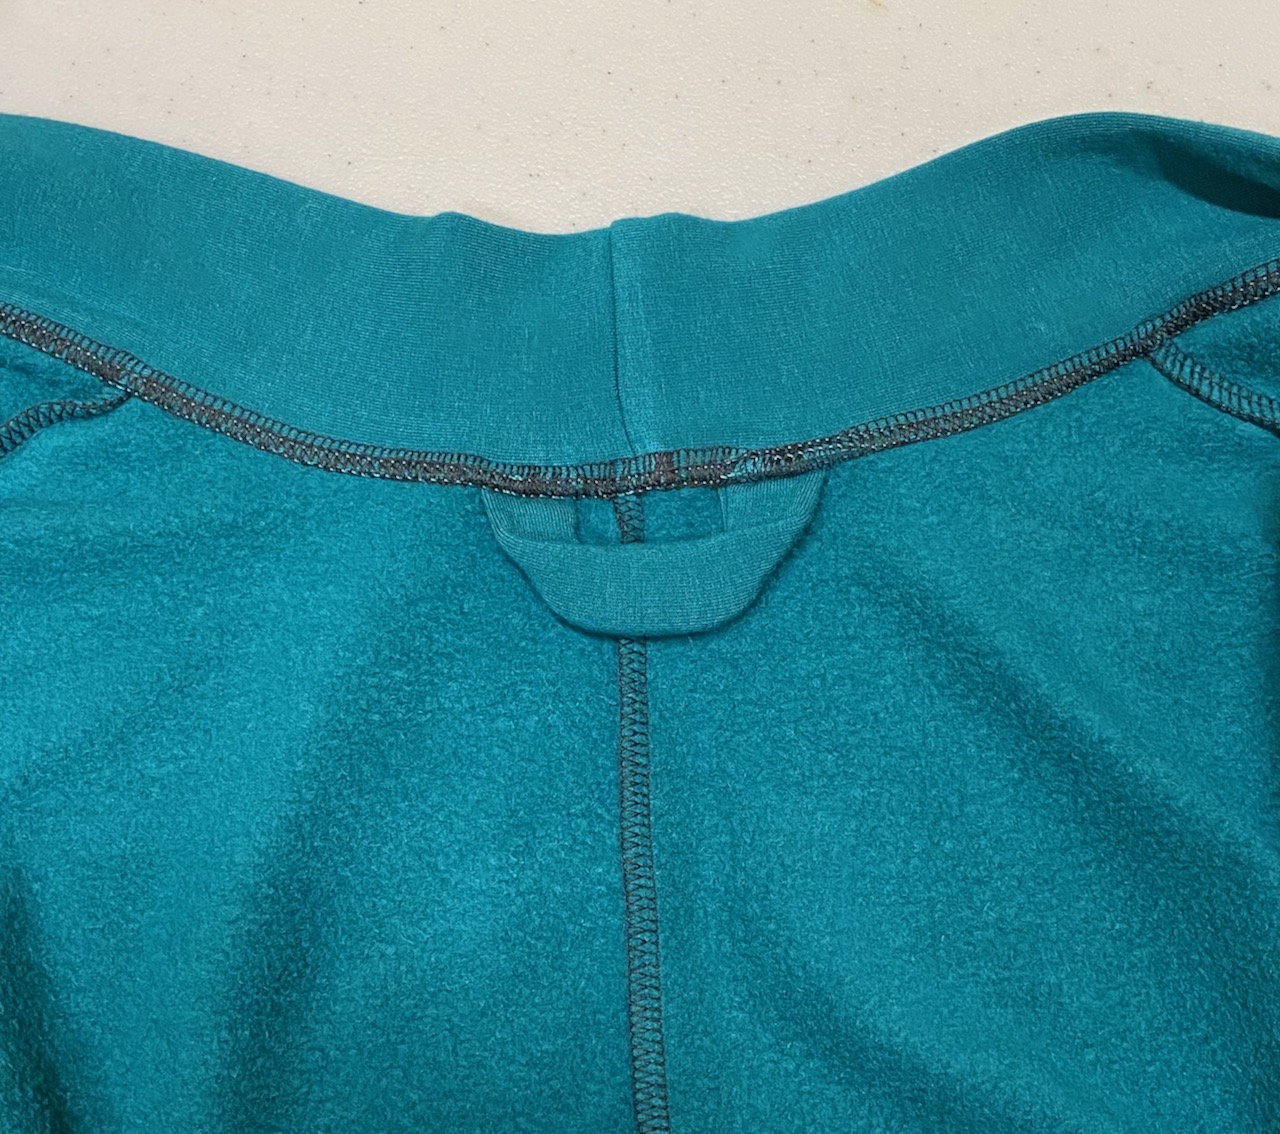

There's a loop for hanging up your robe built into the neckline.


The band around the robe ends in a nice clean finish.


Loops at the waist hold the lovely, long belt above the pockets which are perfectly placed.  We need pockets, right?

Perfect Pocket Corners

And speaking of pockets, I like to see nice crisp corners on my pockets, so I've developed a process to get what I need.


After you've created the hem at the top of the pocket, press the edges in 3/8".


Now open the bottom corners and fold them in to create a diamond shape, the edges of which stay inside the pocket edges.


Steam press it flat.
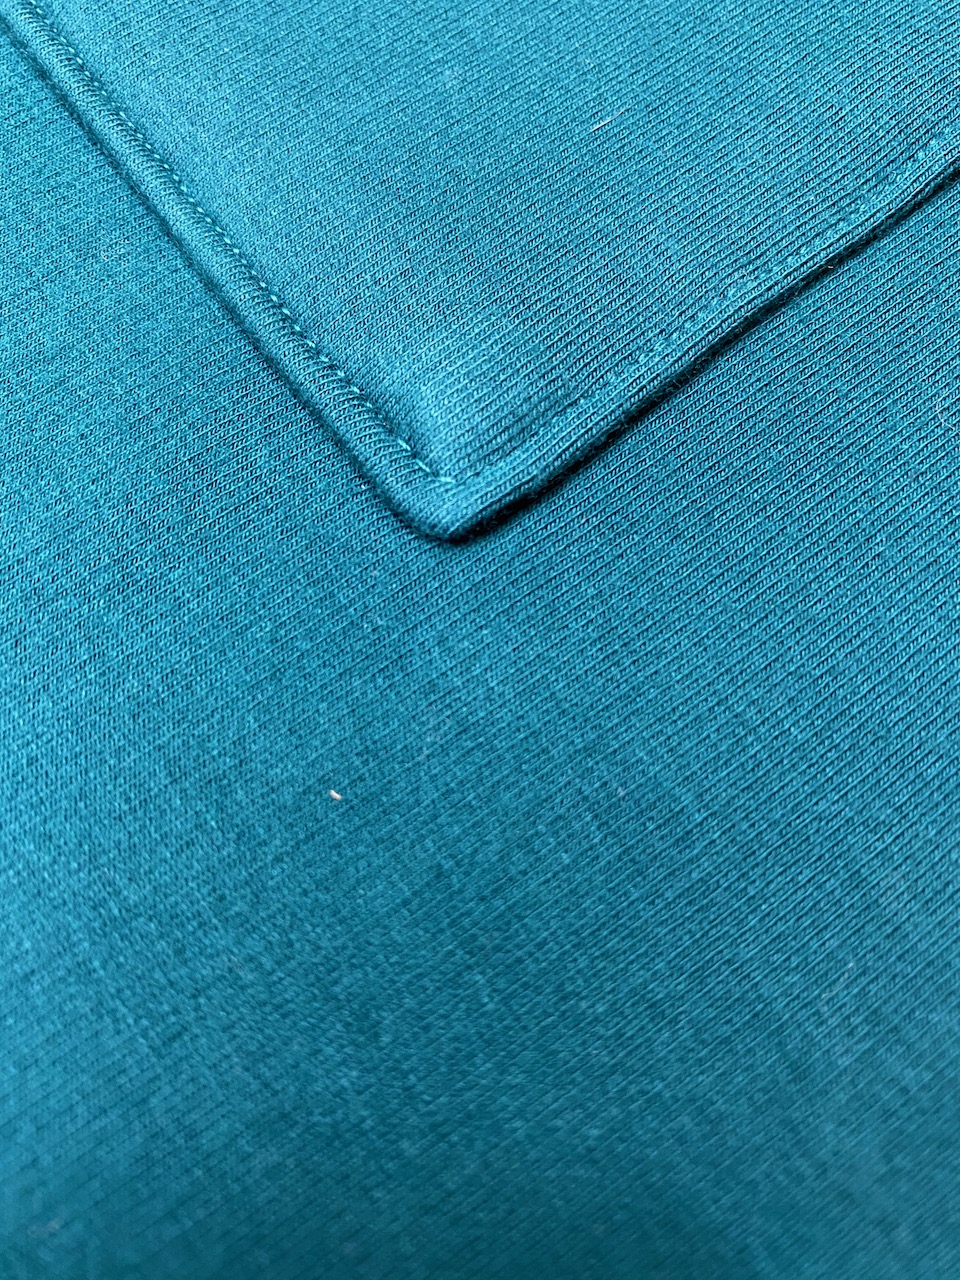

And once you've stitched your pocket in place (remember to use lots of pins!) you won't see any edges peeking out at all!  Pocket perfection!

Adding Ties

Want to make sure your robe stays closed?  You can add ties and do it discretely so that they don't show.

First, put on the robe to establish where you want to add the ties - you'll want 2 sets - one near the outer edge and another at the inside edge.  I marked mine with safety pins, then put the robe on to make sure any outside stitching marks were hidden by the belt.

Then I replaced the safety pins with chalk marks for where the ties would be attached.

Next - what to use for ties.  I had an old roll of seam binding inherited from my mother-in-law's stash.  How old?  Well, you can see it's marked with 15 cents!  I cut what remained on the roll in 4, giving me ties about 8" long.  A bit longer would have been better, but I used what I had.  I cut a forked tongue in one end to prevent fraying and folded over the other end which would be stitched to the robe.  You can use a fine ribbon - or anything that's not going to be too bulky. 
I pinned the ties in place and then stitched them down.  If your robe's material is fine, you might want to reinforce under the ties.


 Now I can wear my robe with confidence knowing that it's not going to accidentally come open!

Love Notions' newest pattern, the Compose Robe is the pattern I've been waiting for.  It's comfortable, can be made in knit or woven fabric and has the clever features I've come to expect from well-made Love Notions patterns.  Available in women's and children's sizes, it's a pattern that belongs in all pattern libraries.  You can get the patterns from my affiliate links below.

Love Notions Compose Robe for Women - sizes XS - 5XL

Love Notions Compose Robe for Children - sizes 2T - 16


Thursday, 6 August 2020

Terra Tunic - with a cowl neck hack

Pattern - Love Notions Terra Tunic
Skill Level - Confident Beginner
Fabric - Discovery Fabrics' Bamboo Terry
Skills - Basic Pattern Hacking


The Terra Tunic was the first pattern I was privileged to help test for Love Notions and it will always have a place in my heart.  The Terra Tunic is a straight fitting top while not being too fitted.  One of the great things about this pattern is the variety of neck styles - scoop, v-neck, funnel, boat, asymmetrical and hooded.  I've sewn 4 of them and found them all an easy sew.  This time, however, I wanted to take the cowl neck from the La Bella Donna and put it on the Terra Tunic.

I had a length of beautiful bamboo terry from Discovery Fabrics that I wanted to use - a deep rich purple with a wonderful hand and lovely drape.  The soft inside will be just so cosy when cool weather comes.  Discovery Fabrics carries quality fabrics at reasonable prices and their service is always excellent.

We are often asked in the Love Notions Pattern Support group if it's possible to take a neckline or sleeve from one pattern and take it to another.  And of course, the answer is yes - and it's actually quite easy.

First I print out and tape together the pattern - but I don't trim the pattern yet.
I lay the La Bella Donna pattern on top of the Terra Tunic front and back, tracing the neckline on the pattern.  Now that I have the neckline I want, I simply use the cowl neck piece from the La Bella Donna and sew it in following the instructions for La Bella Donna.  It's a simple as that!

Serging the side seams

The Terra Tunic has a split hem with the back being a little longer than the front.  The instructions say to machine stitch the side seams - and of course that works perfectly.  I love my serger, however, and wanted to serge those side seams.  But how do you do that with a split hem?  It's not hard!
I machine stitch the area at the top of the split hem - starting a couple of inches above.
Then I serge the seam starting at the sleeve end and when I get to the machine stitched portion, I veer off sharply - I fold the seam off to the left to make this move easier.
Now to the ironing board.  Press side seams to the back and when you get to the split hem, fold back the vent pieces and give it a good steam press.  If you have a clapper, this is one of those perfect times to use it so you get the top of the vent as flat as possible.

I love my Terra Tunics.
 I've made matching mother/daughter ones for my daughter-in-law and granddaughter with the boat necks.   If you want to know how I made my granddaughter's tunic to match her mother's check this link out - Mummy & Me Terra Tunics.
I've used the asymmetrical neck for one I did a Love Notions blog post on embellishing with grommets.  If you want to know more about this one, here's a link - How to Add Grommets to a Split Hem.
And I used an amazing border print for the funnel neck Terra Tunic I made during testing.

The Terra Tunic gives you options that allow you to make comfortable, attractive tunics with neck styles that will make every shirt different and unique.  If you don't already have this pattern, you can get it through my affiliate link below.

Love Notions Terra Tunic


Thursday, 23 July 2020

La Bella Donna - More Inclusive Than Ever

Pattern - Love Notions La Bella Donna
Skill Level - Confident Beginner
Fabric - Discovery Fabrics Bamboo French Terry
Skills - Hemming, Pressing

Love Notions' popular pattern, La Bella Donna, has been re-tested and re-issued.  This super-easy and oh-so-comfortable pattern is now sized XS to 5XL.  What's more, it now has a full bust pattern piece. It comes with three sleeve options; short, three-quarters and full length.  You can make it with the scoop neck or have a hood or cowl instead.  And for finishing off?  Hem, facing or shirt band.  It comes in shirt and tunic length.  As usual, there are so many options!

The pattern calls for medium weight knit fabrics with at least 40% stretch, and I chose to make mine from Discovery Fabrics' Bamboo French Terry in a lovely periwinkle blue.  This fabric has beautiful drape and stretch and is so comfortable to wear.  Everything I've bought from Discovery Fabrics has been top quality and the service is great.
I chose to make my latest La Bella Donna with three-quarter sleeves as I'm always pushing them up anyway.  It's such a comfortable length for me.  There's a long cuff, but the seam is above my elbow - the perfect spot.  This is a very quick pattern to sew - so few pieces!  Body, optional cowl/hood, sleeve cuffs/bands - that's it!

I don't know why I haven't made a cowl neck for myself before - I just love it.  And for a person "of a certain age" it's a perfect neckline!  Made in my French Terry, it drapes beautifully.  And once I sewed the cuffs and cowl on, all that was left to do was hem the bottom - I told you this was a quick pattern!

You have a choice of a band at the hips to finish or a hem which can simply be turned under a half inch and stitched, or faced and stitched.  I decided to hem.

You know I can't review a pattern without throwing in a hint or two, and since La Bella Donna has that flattering curved hem, I thought I would show you how easy it is to hem a curved edge.
The first thing I did was to turn the hem under .5" and secure with lots of long pins.  And then you notice that the curved hem gives you lots of bulges.  Don't panic - it's easy!
This is where your steam iron comes into play - I hate ironing, but I can't sew without my steam iron. Simply press the iron on the bulges and they shrink!  And now you can see why you use long pins.
And just like magic, the bulges are flat.  And if you wind up with a tuck or two, it doesn't matter because it's on the inside of the garment.

Let's look more closely:
Before
After
After you've stitched your hem (I did mine on my coverstitch) you may notice some waviness.  Time to press again.
I turn my  iron sideways and slide it gently down the body towards the hem.  And any waviness is a thing of the past.
La Bella Donna - which is Italian for beautiful lady - is a pattern that is quick and easy to make and the result is an attractive, comfortable garment.  There are so many options that you can make it time after time and each one will be unique.  If you bought this pattern in the past, you can get the updated version in your Downloads on the Love Notions website.  If you don't have it - you need it!  You can get it from my affiliate link below.

Love Notions La Bella Donna sizes XS to 5X

Saturday, 20 June 2020

Vanguard! For a Biking Shirt!


Pattern - Love Notions Vanguard Kit long sleeve tee
Skill Level - confident beginner
Fabric - Discovery Fabrics Polartec Delta
Skills - Colour blocking

My grandson is turning 9 in a few weeks.   For part of his present, he said he wanted a biking shirt with padded elbows.  I knew that I couldn't possibly make something that would give him proper protection, but my son assured me that what he really wanted was a shirt with a moto look.
- like the Moto Maxx pants I'd made him the previous year.  Okay - that I can do! (Click on any picture to see it in more detail.)

The Fabric

I had the perfect fabric on hand.  He loves athletic fabrics and Discovery Fabrics specializes in athletic fabrics.  I had 3 colours of Polartec Delta sitting on the shelves - marine blue, apple green and grey - and decided to use them all.
Polartec Delta is a wonderful fabric and I had previously used it to make competition shirts for my son and his training partner.
It's highly breathable, has superior wicking properties, regulated drying, reduced clinging, odor control and is highly durable.  You can see from the picture above that it's also constructed to pull moisture away from your body. Just what my hot-bodied grandson needs.

The Pattern

The Vanguard Kit is one of my most-used patterns.
There are all kinds of options built right in - even colour blocking.  But the colour blocking I had in mind, I was going to have to figure out myself.

Colour Blocking

I drew up and coloured a design of what I had in mind and then printed off and cut out the plain fronted shirt with long sleeves.
Then I drew lines on the pattern pieces and wrote the colour on each section also making a note of where I would have to add 3/8" for seam allowance.  I cut double the middle grey sleeve sections, because it was going to have moto stitching on it.  That was going to be the padded portion.
After cutting the colour block sections, I placed each colour with its fabric.  I was ready to cut out.
I didn't add a seam allowance as all my lines were going to be straight.  I used my ruler as the guide to add the seam allowance.
You can see on this piece that the seam allowances are all there.

Sewing

I worked on the front first.
I laid all the pieces out in order and working from the bottom up, pressing the seam allowance up (and I used a pressing cloth so the fabric wasn't damaged) and topstitched as I went.  The diagonal blue section was added last and topstitched.

Then on to the sleeves.


I laid them out just as I did with the front with the grey section being two layers, pressing the seams up and topstitching.

For the moto stitching, I drew lines with tailor's chalk.
I stitched the lines on my coverstitch machine.  I could have used my regular sewing machine, but I wanted this section of the sleeve to have lots of stretch.  I used a notch on my foot as my guide in stitching.
So here is what the sleeve looks like front and back.
Now with all the piecing done, all I had to do was sew up the pieces, put on the neckband and hem.  Sounds like a lot of work, but it only took me a morning.  I know my grandson will love his new biking shirt.  He loves this fabric and he'll appreciate all the amazing properties which will keep him cool and dry while he's out on the mountain biking trails.  If you don't already have this pattern, you can get it from my affiliate link below.  And do check out Discovery Fabrics for all the amazing products they carry.

Love Notions Vanguard Kit
Discovery Fabrics


Sunday, 17 November 2019

Love Notions' Octave Coat - and a few hints


Skill Level - Intermediate
Fabric - Discovery Trekking Outfitters' Polartec Windpro Stretch
Skills - making belt loops, marking, pressing, hemming

Love Notions' newest pattern is a stylish coat with either a shawl collar or a dramatic hood.  You have the option of a button closure or a belt - or choose both!  It comes to mid-thigh which is the perfect length for covering a tunic top.  You can make it lined or unlined and the pattern includes the new expanded sizing.  It even has a full bust pattern piece!
The Octave Coat is drafted for woven fabrics but can be made with stable knits as well.  I chose to make my coat with Discovery Trekking Outfitter's Polartec Windpro Stretch fleece - a fabric I fell in love with the moment I laid hands on it!  It's light, yet warm and is water repellant and wind resistant.  It cut and sewed beautifully and has just the right stability for this pattern.

I've bought a few coat patterns over the years - some I've tried and failed at and others I was just too intimidated to try.  Until now! I found the Love Notions Octave Coat a much easier sew than I was thinking it might be.  Tami's patterns often have videos to take the mystery out of some of the techniques and this pattern is no exception.  You will find a video to help you with the unique pocket construction and two to walk you through steps in lining the coat.  And I have a few hints to help you along!

Making Belt Loops

When I took a serger course, I learned a quick and easy way to make belt loops. 
First, serge a tail that is longer than the loop pattern piece.
Tuck the tail in the centre of the pattern piece and leave it hanging out the end.  Now fold the loop piece over the tail, keeping the tail in the fold - well away from your needles.
Serge your seam allowance - in this case .5".
Use the tail to pull the loop right side out.  My fabric was thick and I had to work a bit to get it started.
And there's your belt loop!

Marking

Make sure you transfer all the pattern markings to your pattern pieces.  I use coloured pins for sleeve/armscye markings and always use one colour for the back markings and another for the front ones so that I never get mixed up.  The markings for the pockets, though, require something a little different.  I found a fine felt marker that contrasted with my fabric.  Since my fabric was quite thick, I wasn't worried about it bleeding through, but you can get fabric markers that will wash out - or you could use tailor's chalk.
I insert a pin through the marking on the wrong side of the fabric and pull back the pattern piece so I can apply a mark to where the pin goes in the fabric.
After I've transferred all the pocket markings for that piece, I give each one another dab to make sure they're clearly visible.

Pressing

I hate ironing clothes but I simply couldn't sew without an iron.  Some fabrics, however, aren't supposed to be ironed, and my fabric fell into that category.  You can still give those seams a press, however - all you need is a pressing cloth.  Mine is an old piece of sheeting.
Set the iron temperature for as low as it will go and still provide steam. Prepare your seam for pressing - is it pressed open or do you need to press it to one side?  Put a cloth over the seam and press over the cloth.  That's all there is to it!

Hemming

The Octave Coat has a slight curve to the hem and that means that unless you allow for that, you'll have tucks in the hem.  That might not matter in a thinner fabric - such as cotton/spandex - but in thicker fabrics it might distort the hem and I want it to look clean on the inside, too.
To get around that, I serged the raw edge of the hem with the differential on my serger turned up.  This draws the fabric in a little.  Now when I pin it, I can give it a good press and I don't need to worry about tucks.
The Octave Coat can be made in woven or stable knits like I used and covers sizes XS to 5XL.  The videos and clear, concise instructions will help you walk through the construction.  It can be dressed up or made more casual depending on which fabric you use.  Comfortable, stylish - this is a coat that belongs in everyone's closet!  You can get the pattern through my affiliate link below.

Love Notions' Octave Coat