
Pattern - Love Notions Constellation Hoodie and Pullover
Skill Level - Confident Beginner
Fabric - Polartec Windpro Stretch from Discovery Fabrics
Skills - Zippers, Pressing Cloths, Clapper Use, Pattern Adjustments
I needed a new casual jacket for spring - one with a full zip. I knew that the Constellation from Love Notions would work if I converted it from pullover to full zip. And I wanted to make it from Polartec Windpro Stretch from Discovery Fabrics. It's a warm fleece-type fabric with a smooth face that repels water.
Doing the conversion would require a number of adjustments - starting with the pattern itself. I sized up one size as I wanted it to be roomy.
Pattern Adjustments
Since the Constellation has 3 pieces for the front, I needed to take two of them and combine them to one.

I overlapped the top and lining portion of the front by 3/8" and added another 3/8" so that the fronts matched.
And since I was going to finish the sleeves with fold over elastic instead of a cuff, I added 2" to the end of the sleeve. I wound up taking 1" off that to get the right length - this was probably the result of sizing up.
Zipper Addition
After the front and back portion of the jacket were stitched together at the shoulder and the outer collar added, it was time to add the zipper. The step that I was concerned about the most was getting the two halves of the separating zipper lined up correctly.

I laid out the jacket front so that the front edges were touching and matching. With the zipper face down on the jacket front, I marked the collar seam on both sides with tailor's chalk.

Then, with the zipper separated, I applied 1/4" double-sided tape to the outer edges of the front, removed the backing and placed the zipper pieces to the front. Note that they go right sides together with the zipper teeth facing in.

When stitching something like a zipper - it's very important to stitch in the same direction on both sides. It does make stitching one side a bit more difficult because of the bulk that you'll be feeding through your sewing machine, but if you want your sides to match properly, it needs to be done!

And the result is a zipper installation that meshes perfectly at the seam.
Pressing and Pockets
Zipper in, it's time to attach the pockets. I'd decided on a modified kangaroo pocket that would be sewed in place as a patch pocket. I made the pocket narrower and shallower than the original in the pattern because I didn't want it taking up the whole bottom of the jacket. And that would mean pressing on a polyester fabric - which you can't do. Or can you?

If you use a pressing cloth, you can! And if you have a clapper to slap down on the pressed seam, you will get nice sharp pressing. With the pressing cloth in place (mine is just a piece of old cotton sheeting) steam iron on top of both layers for a few seconds. Then place the clapper on top and press down.

This is how the collar looked after pressing. The difference between the pressed and unpressed portion really stands out!

Before I was ready to add the pockets, I tried on the jacket to see where the pockets should be placed and marked it with a pin.

A pressing cloth, steam iron and clapper made it possible to fold in the edges of the pocket. Even the corners worked - I pinched the sides together to make the corner stand out and then carefully fold it in, pressing it down. This hides all your fold edges.

To attach the pocket measure from the sides and bottom so the pockets are matching and then pin, pin, pin!
Hem Finishing
Once the sleeves and sides are sewn up, you are ready to hem. I chose the curved hem option which sometimes makes hemming a little more challenging, but again - with the pressing cloth and clapper, it's really a simple job.

First, fold the hem over the zipper ends - right sides together and stitch up the edge following the stitching line that attached the zipper. Now open up that corner and you're ready to fold up the hem - use lots of pins!

You can see that there are lots of bulges between pins. This is where the pressing cloth and clapper come into play. Lay the pressing cloth on top of the hem and steam press.

And look how nice and flat the hem is.
Topstitching the zipper
The last job is topstitching the zipper and when you're dealing with a stretchy fabric on top of a stable one, things can definitely go sideways! You can avoid accidental tucks and warping of the fabric with a simple trick I learned from Discovery Fabrics.
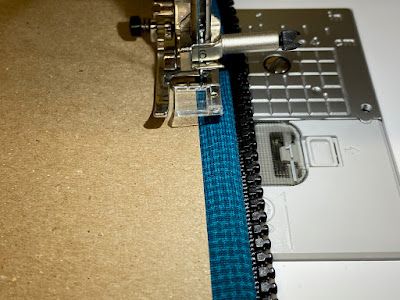
With the project under your sewing machine foot and ready to go, lay a piece of light carding next to the needle, under the foot. As you stitch down beside the zipper, move the carding down as well. This keeps the fabric from shifting.
So that's it! Jacket done and ready to wear!