Tuesday 5 April 2022

Sewing Athletic Fabrics


Pattern - Love Notions' Thomas Track Pants for Men
Skill Level - Confident Beginner
Fabric - Yoga Stretch from Discovery Fabrics
Skills - Right side/wrong side, steam pressing, wicking, washing


My husband's been asking for track pants for a while now and Love Notions has come out with a quick and simple pattern that fills the bill.  It can be made in knit or woven and can be plain or colour blocked.  There's also the option to have zippers at the hem to make it easier to pull on or off over shoes.  Lots of possibilities, too, with this pattern.  Make it in a flannel fabric for PJ bottoms.  How about moisture resistant fabric for rain pants?


These pants are just begging to be made in athletic fabric, so I made hubby a pair in Discovery Fabric's Yoga Stretch.  Yoga Stretch is a type of supplex which is actually a treatment done to nylon to make it feel more like cotton.  It's very comfortable and versatile and I thought it would be perfect for the Thomas Track Pants.   I had lots of Yoga Stretch in heathered charcoal which is 48% nylon, 45% polyester and 7% spandex.  

At Discovery Fabrics, they specialize in athletic materials that you generally don't find in a fabric store.  They have a large selection of quality fabrics - everything from heavy winter wear to light summer wicking fabrics - and everything in between.

Not so long ago, I'd never sewn athletic fabrics before, and there was a bit of a learning curve for me with this new category of fabrics, so I thought I'd pass along some of the things I've learned along the way.

Wash your fabric

Although most athletic fabric isn't going to shrink on you, I always wash and dry before I sew.  And even though the care instructions are for washing in cold water and drying on a low setting, I always wash and dry the way it would be handled if for some reason hubby did the laundry!  Leslie Hanes from Discover Fabrics calls this "bomb proofing"!  There are other reasons to always wash fabrics before you use them, and to me, besides the possibility of shrinkage, the most important reason is that you are removing contaminants which might have come into contact with the fabric on the way from the mill to the warehouse.  Just ask someone who's moved bolt after bolt of new fabric to show you how dirty their hands get!

How do you tell the right and wrong side?

Sometimes a fabric looks virtually the same on both sides.  And especially if you've washed it, you might not know which is the right side.  And sometimes, athletic fabrics will lay perfectly flat, making it hard to decide which is the right side.  With nearly all knits, there's an easy way to tell.


Along the selvage edge, if you stretch the fabric it will curl to the wrong side.


Along the cut edge, if you stretch the fabric it will curl to the right side.

It's easy to mix up the sides when you're sewing if the fabric looks the same on both sides - and I've certainly done that with black fabric!  It wasn't until I wore the pants I'd made outside that I suddenly realized I'd mixed up my sides!  Now I take extra care before I start pinning pieces together.


And looking at the cut edges of these two pieces, I know the edges to the right are against the grain and I can easily see that top piece is wrong side up and the bottom is right side up.

And while this works for nearly all knits, of course there are exceptions.  For instance, an interlock will look the same on both sides - there is no right and wrong side.  But when it comes down to it - unless it's a wicking fabric, the side you choose is the correct side.

Wicking Fabrics

Wicking fabrics are wonderful, because the way they are made, they pull moisture away from your body and allow it to evaporate off the outside face of the fabric.  With some wicking fabrics, it's easy to tell right from wrong side because the side that goes against your body has a waffly texture.  Some aren't so easy, though.  A drop or two of water will help.

This fabric is Polartec Delta and is smooth on both sides.  I put drops of water on the wrong side to demonstrate how it works.


The top two wet marks are on the wrong side of the fabric, and you can see that they're already being drawn away and are fading.  The bottom wet mark is on the right side of the fabric.  It's much darker because the moisture is being pulled from the back to the front.

Steam Pressing

You may think that you can't press athletic fabrics, but you can.  The secret is a pressing cloth.  I just use a piece of old sheeting, but when laid on top of a fabric that would normally melt if touched with an iron, I can even leave the iron on for a short while to create that necessary fold for a hemline.  Or in the case of the Thomas Track Pants, a seam that I can press open to accommodate pockets.

I open the seam with my fingers and quickly lay the pressing cloth on it to keep it open.  Then I place the steaming iron on it for a couple of seconds.


And you can see in this picture the difference between where the seam has been pressed open and where I still need to iron.


And now for a bit more about the Thomas Track Pants for Men.  This versatile pattern is also a pretty quick sew.  I assembled the pattern, cut it out, and sewed it up complete with pockets in a morning.  The colour blocked and zippered options will take a little longer but you can definitely do it in a day.  The instructions are easy to understand and the pattern is available in AO versions for the print shop, a projector version and the print-at-home version that's a snap to put together as it's trimless.  Definitely a pattern to have in your collection.  And be sure to check out the quality athletic fabrics at Discovery Fabrics!


Saturday 5 February 2022

Pullover to Full Zip


Pattern - Love Notions Constellation Hoodie and Pullover
Skill Level - Confident Beginner
Fabric - Polartec Windpro Stretch from Discovery Fabrics
Skills - Zippers, Pressing Cloths, Clapper Use, Pattern Adjustments

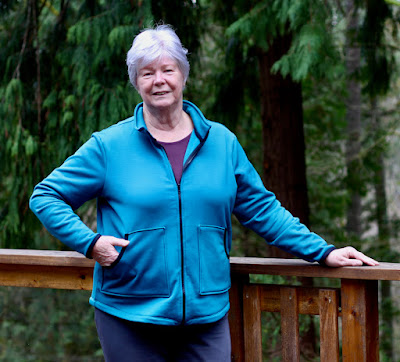
I needed a new casual jacket for spring - one with a full zip.  I knew that the Constellation from Love Notions would work if I converted it from pullover to full zip.  And I wanted to make it from Polartec Windpro Stretch from Discovery Fabrics.  It's a warm fleece-type fabric with a smooth face that repels water.

Doing the conversion would require a number of adjustments - starting with the pattern itself.  I sized up one size as I wanted it to be roomy.

Pattern Adjustments

Since the Constellation has 3 pieces for the front, I needed to take two of them and combine them to one.


I overlapped the top and lining portion of the front by 3/8" and added another 3/8" so that the fronts matched.

And since I was going to finish the sleeves with fold over elastic instead of a cuff, I added 2" to the end of the sleeve.  I wound up taking 1" off that to get the right length - this was probably the result of sizing up.

Zipper Addition

After the front and back portion of the jacket were stitched together at the shoulder and the outer collar added, it was time to add the zipper.  The step that I was concerned about the most was getting the two halves of the separating zipper lined up correctly.


I laid out the jacket front so that the front edges were touching and matching.  With the zipper face down on the jacket front, I marked the collar seam on both sides with tailor's chalk.


Then, with the zipper separated, I applied 1/4" double-sided tape to the outer edges of the front, removed the backing and placed the zipper pieces to the front.  Note that they go right sides together with the zipper teeth facing in.


When stitching something like a zipper - it's very important to stitch in the same direction on both sides.  It does make stitching one side a bit more difficult because of the bulk that you'll be feeding through your sewing machine, but if you want your sides to match properly, it needs to be done!


And the result is a zipper installation that meshes perfectly at the seam.

Pressing and Pockets

Zipper in, it's time to attach the pockets.  I'd decided on a modified kangaroo pocket that would be sewed in place as a patch pocket.  I made the pocket narrower and shallower than the original in the pattern because I didn't want it taking up the whole bottom of the jacket.  And that would mean pressing on a polyester fabric - which you can't do.  Or can you?


If you use a pressing cloth, you can!  And if you have a clapper to slap down on the pressed seam, you will get nice sharp pressing.  With the pressing cloth in place (mine is just a piece of old cotton sheeting) steam iron on top of both layers for a few seconds.  Then place the clapper on top and press down.


This is how the collar looked after pressing.  The difference between the pressed and unpressed portion really stands out!  


Before I was ready to add the pockets, I tried on the jacket to see where the pockets should be placed and marked it with a pin.


A pressing cloth, steam iron and clapper made it possible to fold in the edges of the pocket.  Even the corners worked - I pinched the sides together to make the corner stand out and then carefully fold it in, pressing it down.  This hides all your fold edges.


To attach the pocket measure from the sides and bottom so the pockets are matching and then pin, pin, pin!

Hem Finishing

Once the sleeves and sides are sewn up, you are ready to hem.  I chose the curved hem option which sometimes makes hemming a little more challenging, but again - with the pressing cloth and clapper, it's really a simple job.


First, fold the hem over the zipper ends - right sides together and stitch up the edge following the stitching line that attached the zipper.  Now open up that corner and you're ready to fold up the hem - use lots of pins!
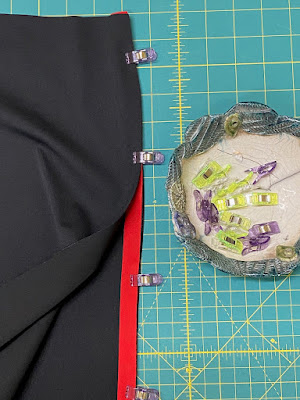

You can see that there are lots of bulges between pins.  This is where the pressing cloth and clapper come into play.  Lay the pressing cloth on top of the hem and steam press.


And look how nice and flat the hem is.

Topstitching the zipper

The last job is topstitching the zipper and when you're dealing with a stretchy fabric on top of a stable one, things can definitely go sideways!  You can avoid accidental tucks and warping of the fabric with a simple trick I learned from Discovery Fabrics.


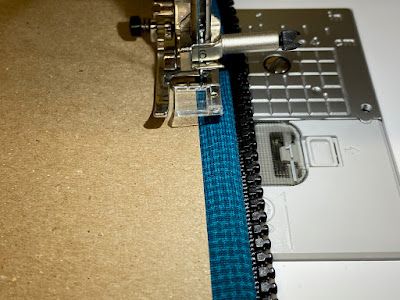
With the project under your sewing machine foot and ready to go, lay a piece of light carding next to the needle, under the foot.  As you stitch down beside the zipper, move the carding down as well.  This keeps the fabric from shifting.

So that's it!  Jacket done and ready to wear!


Wednesday 29 December 2021

A Little Love for Discovery Fabrics

 I started sewing clothes in earnest when my grandkids came on the scene 10 years ago.  At that time, it was strictly cotton knits that I was using while I was learning my way around garment sewing and how to sew with knits.  Eventually I started to get more brave and began thinking that I'd like to make some outer wear - but where on earth would I find the fabric?  Certainly not at my local fabric store!

So the online searches began and I kept coming across the name Discovery Trekking Outfitters - and holy cow - they were actually Canadian and not that far from me!  They sold active wear, but they also sold the fabric!


I think my first purchase included Solar Stretch and I made a golf shirt for my husband (Love Notions Dockside) - which he still loves and wears - and which still gets compliments for the super fabric pattern.


I got some for me as well and made a top (Love Notions Forte) to wear to a Valentine's party - the young hostess insisted that we wear red which is not a colour I feel comfortable in, but the gorgeous Poppies pattern had lots of colours, including the compulsory red. 

Okay - I was hooked!  So we had to take a drive up Vancouver Island to see where all this marvellous fabric came from.  And I met Polartec Windpro Stretch in the most gorgeous brown.  I didn't buy it at that visit, but when it came to testing a coat pattern, I knew exactly what I wanted to make my final test with!


I found the fabric a dream to work with - cuts like butter and sews up a dream!  It's warm but not heavy and perfect for our west coast winters.  AND it's water repellant!  This is Love Notions Octave Coat

I've since used it many times - warm winter pants (Love Notions Moto Maxx) for my grandson and most recently a hoodie which was part of his Christmas present -

he immediately put it on and has been wearing it constantly ever since! (Love Notions Samson Hoodie)  My grandson is super picky about his clothes!  No more cute patterns on his fabric - he wants fabrics that work with his active lifestyle and that are comfortable to wear and he's not shy about naming the fabrics he wants.  


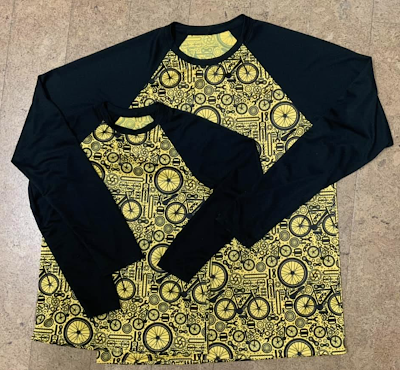
Discovery is constantly researching and offering new fabrics.  This year, they brought in a wicking fabric they're calling Coolfab and had some of it printed.  When I saw the sample with bicycle parts on it, I knew exactly what my mountain biking enthusiast son and grandson would be getting for Christmas - father and son cycling shirts! (Jalie Nico)

Discovery doesn't just carry athletic fabrics - they also carry natural fibre fabrics and their bamboo products are a huge favourite of mine!


Take this dolman top with a cowl neck - bamboo terry and soooo comfortable! (Love Notions La Bella Donna)


Or this bamboo fleece robe (Love Notions Compose Robe)  And now my granddaughter is getting into the act - asking for solid colours in the bamboo family.  

Her most recent request was for bamboo terry tops and so I made her these.  (Love Notions L'il LDT, Sloane and La Bella Donna)

I think you get the idea about how much I love their fabrics - but how about the people behind them?

Leslie and her staff are unfailingly helpful, kind and efficient.  If you have questions about their fabrics, they get back to you so quickly.  There are numerous videos which might walk you through the store, tell you the properties of the various fabrics, and introduce you to sewing techniques that will make your project work more easily.  I simply can't say enough nice things about them!

And just because they're in Canada, don't think that's where they only sell - they ship internationally.

Discovery Fabrics is my favourite place to shop for fabrics and I have absolutely no hesitation in recommending them.  

Friday 22 October 2021

Moto Maxx Shorts with Flat Piping


Pattern - Love Notions Moto Maxx Set
Skill Level - Confident Beginner
Fabric - Polartec Neoshell from Discovery Fabrics
Skills - flat piping, ironing

My mountain biking grandson doesn't often ask for me to make him things, but when he does, I jump right to it!  He asked me to make him some long shorts "out of the same stuff as the cross country skiing pants" that I'd made him.  They were actually for mountain biking but apparently they're excellent for skiing as well!

I decided to use the same pattern - the pants from the Moto Maxx Set - that I'd used for his pants.  It's a slimmer fitting pattern, which is perfect for biking - and skiing, apparently!  I had the Neoshell in black and tomato red, so I thought I'd try out a technique I'd seen for flat piping.  Polartec Neoshell with Stretch/Ease is an amazing fabric which is "waterproof" yet breathable and perfect for the purpose.


I cut strips 1.25" wide with the grain, which when folded over and sandwiched in the side seams, would give me .25" piping.  


And of course, I practiced first.  


I pressed the strips using a pressing cloth.  This allows you to press fabrics you can't iron.


To get the sharpest press possible, I used the clapper my husband made me.


I clipped the raw edge of the piping to one side seam of the shorts and then carefully laid the other pattern piece on top, clipping the pieces together.  The strip was sandwiched between the front and back with the folded edge in.


Then I serged the side seam being careful to make sure all the raw edges were together.  On my serger, 3/8" is right at the edge of my presser foot, so getting the seam exact was easy.  It's important that your seam is consistent.


Then to make sure that the piping would lie to the back, I coverstitched down the front beside the piping.

Once these steps were completed, it was an easy matter to finish sewing the shorts.  Now my grandson has his cycling shorts as requested, with a little extra pizzazz!

If you don't already have the Moto Maxx Set in your pattern library, you can get it from my link below:

Moto Max Set sizes 2T - 14

Saturday 2 October 2021

Cloth Gift Bags


 Can you believe how quickly time is flying?  It's almost time to start thinking about Christmas!  In our family, we don't wrap presents with gift wrap anymore - we use fabric gift bags which continuously make the rounds.  It's a big saving on expensive gift wrap and is good for the environment as well because you can't recycle most gift wrapping paper. 

And of course, I don't just use these gift bags at Christmas.  Birthday presents, baby gifts - they all get tucked into a homemade gift bag.  For Christmas bags, I buy Christmassy fabric when the fabric stores put it on sale for a greatly reduced price.  And I check out the sale cottons and thrift stores for all the other bags.


So let's get started!  These gift bags will have channels for ties so the first thing I look for is something suitable and since I always have a good supply of homemade bias tape, I immediately checked there and found some burgundy tape that matched my fabric.  You can use so many things for ties - ribbons, shoelaces, cords - the options are endless.

For your bag, you want to cut the width you need plus about 3" for side seams and ease in the bag.  For the length you want the height of what you're bagging X2 plus about 5 or 6".  So once the fabric is cut, you're ready to assemble.


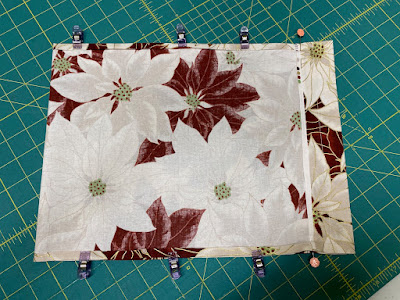
Fold over and iron 1/4" around each edge.  I just eye-balled it but you can be more precise if you want.


Then on each end, fold over and iron another 2"


Stitch along the bottom of that 2" hem.  Then taking into consideration the width of your tie, stitch another line above that.  Make sure that top stitching line is the same depth on each end of your bag so that the top hems match.


Now fold your right sides together.  I clipped the sides together and put in a pin at the bottom channel stitching line which is where I will stop.  Stitch the sides - about 1/8" from the edge, backstitching at each end to secure the seam.  Turn the bag right side out and press it.  Pressing isn't totally necessary, but it does make finishing easier and looks better, too.


Now you're ready to insert the ties in the channels.  I cut mine a couple of inches longer than the width of the bag as I didn't plan on finishing with a bow.  If you want to tie bows in each end,  you'll want a couple more inches on that.  I used a safety pin to thread my ties through.


Ties threaded - you're done!  You've made a lovely gift bag that someone will be delighted to receive and think of all the good you've done for the environment.  And it didn't take much more time than gift wrapping a present.  The added bonus is that you're bound to get the gift bag back at some point!


Sunday 29 August 2021

Adventures in Scrap Busting


I do a lot of sewing for children and buy the quality cotton/spandex I use from l'oiseau fabrics who bring all their materials from Europe.  The patterns are so beautiful that I can't bear to throw away leftover bits.  A gorgeous digital print with foxes, chipmunks and birds on it that I purchased 5 years ago is a prime example.  I only had a couple of small pieces left - definitely not enough for much.  However, if I colour blocked with a solid - maybe I could use a bit more of it!

I chose the Love Notions Vanguard pattern in a size 2T.  It has built-in colour blocking options but I was going to have to do some creative colour blocking of my own.


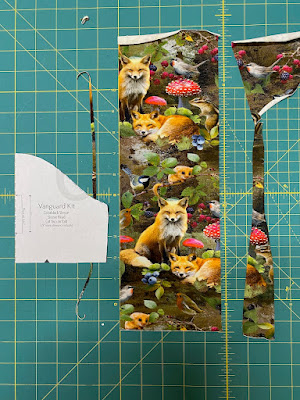
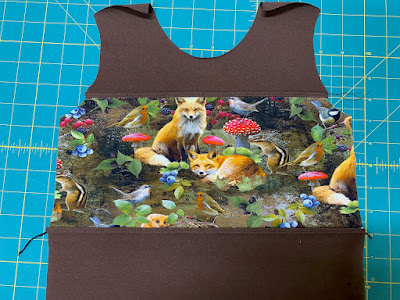
I was able to do a front panel using the Vanguard's colour blocking middle piece.  But that was all I could get out of it.  The rest of the fabric bits were too narrow for even the sleeves.  I would have to add to the sides.


I squared off the sides of one of the long narrow strips after verifying that I could get a fox in each short sleeve.


Then I cut strips of the solid colour for either side.  I serged the strips on with 1/4" seam allowance and coverstitched the seams flat.


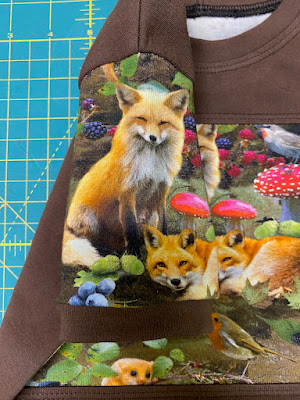
Now I could cut out the sleeves.  I folded the new piece in half vertically and cut out the sleeves, taking care to have the foxes in the centre.


Now I could stitch all the components of the colour blocked front together, and I coverstitched above and below the centre panel.  I wish I could have gotten one of the fox's ears in the panel, but unfortunately there wasn't enough for a 1/4" seam allowance.

All of the colour blocking out of the way, it was a simple matter to put the shirt together.  I wish I could say all of the adventures were over, but unfortunately they weren't!  I discovered that instead of cutting a back from the solid brown, I'd cut a front!  Time for some more creativity!  I managed to cut an insert to fit in and coverstitched below it.  And then I had to cut a new neckband because the opening was now wider!  However, I got it done and as for the back, that was planned, right?

So here's the shirt I managed to get from tiny pieces of a beautiful fabric.


Here's the sleeves.

and


And finally the back on which I did some more colour blocking - so that I didn't have to bin the whole project.  

I'm pretty happy with the outcome.  This reinforces my belief that even the smallest scraps can have a use and reminds me to be more careful with my pattern pieces!